Nov 25, 2014

With Everyone Focused on Ferguson, Obama Quietly Passing 3,400 New Regulations Before Thanksgiving

obamasmile

Although the government and mainstream media perfectly timed the Ferguson grand jury decision to go off right after President Obama passed executive amnesty (which, magically, no one in the mainstream media is talking about anymore), it also works out well for the White House that this event transpired right before the upcoming holiday.

Why, you might ask?

Because the Obama administration has prepared, for the fifth time now, to oh-so-quietly release 3,415 brand spanking new regulations right before Thanksgiving while everyone just so happens to be totally distracted and focusing on the orchestrated civil disorder going on in Ferguson.

Via The Daily Caller:

The federal Unified Agenda is the Obama administration’s regulatory road map, and it lays out thousands of regulations being finalized in the coming months. Under President Barack Obama, there has been a tradition of releasing the agenda late on Friday — and right before a major holiday.

“It’s become an unfortunate tradition of this administration and others to drop these regulatory agendas late on a Friday and right before a holiday,” Matt Shudtz, executive director of the Center for Progressive Reform, told The Hill newspaper.

The White House’s regulatory agenda for spring 2014 was released on the eve of the Memorial Day weekend, when millions of people set out on weekend getaways or family vacations.

“It’s unfortunate because it’s an update on protections for Americans of all stripes,” Shudtz told the Hill. “It lays out the administration’s plan and it deserves more attention.”

Nice, right?

Apparently, this release comes new and improved with even more regulations than last time, and it even comes complete with the added bonus of having 189 rules which come with a nice fat price tag of $100 million.

It’s funny… Once upon a time, throwing out an amount like a hundred million would’ve made some people’s eyeballs literally pop out of their heads. I can use the word literally in a figurative sense now without being incorrect, because apparently we live in such an Idiocracy society that the official definition of the word “literally” has been updated to include “used for emphasis or to express strong feeling while not being literally true.”

… I’m not even kidding.

literally
See?

Anyway, who knows what evil will be lurking in those 3,415 new regulations. No, really. Who knows? Hardly anyone knows, because these regs will be slipped in under cover of concocted protests in Ferguson, a plate full of turkey and stuffing, and a football game.

Delivered by The Daily Sheeple

http://www.thedailysheeple.com/with-everyone-focused-on-ferguson-obama-quietly-passing-3400-new-regulations-before-thanksgiving_112014#sthash.Hl6NDmqH.dpuf

Self-defense in a “flash mob”‏ / Riot?


Ferfal,
Do you have any thoughts about how a CPL/CCW/CHL holder should react in a flash mob situation that turns potentially violent? I know that the best scenario would be to leave when the mob begins, but say you’re trapped in a store when they start trashing the place, and they see you and decide you’re to blame for their economic troubles and start to come at you. In such a situation, your life is in definite danger, but you can’t just start shooting indiscriminately. Any advice? With the Ferguson ruling expected any day now, things might get interesting in a hurry.

Dan
Hi Dan,
Its an interesting topic. Right now we’re waiting to see what happens in Ferguson but this can truly happen anywhere. Between riots, looting and flash mobs, its important to know how to react, what to do and what NOT to do.
First, get proper training. Even before buying a gun, learn how to use it properly. Shooting cans with your cousin or uncle does not constitute professional defensive shooting training. If you haven’t been properly trained, no matter how well you think you shoot you still haven’t don’t know how to FIGHT with the gun, and that’s very different from target practice and hunting.
Second, its important to actually carry your weapon at all times whenever possible. I have said so many times but its worth repeating. The gun left in the safe will do you no good, it’s the one on your hip that matters when the chips are down.

When it comes to dealing with a mob, the first thing to keep in mind is that drawing a gun is the last thing you want to do. Stay calm, its probably not about you and if its not about you don’t change that by bringing your gun to the equation. Leave it in your holster for now. Whenever possible, leaving, even running is better than shooting someone. I’ve been caught in a number of protests, roadblocks and lootings. In most cases you are better served by remaining calm and moving away from the group. That alone works beautifully well. When it comes to getting trapped, try to avoid that as much as possible. Whenever walking into any room, always identify at least two exit points. The one you just walked through would be one, but find another one. Fire or riot, you still need to know how to escape.

If the violence is directed against you and you can’t escape, we’re talking about a pretty bad series of events where many mistakes were already made. In this case, with your safety at risk and a reasonable fear for your life, you can bring out your gun. This doesn’t mean you start shooting, but it may still help, as guns often do. No one wants to get shot, and with your gun drawn you may have bought a few seconds given the surprise/fear factor guns usually have. Make the most of those seconds, move away fast. If you wait too long those nearby may lose that fear, become more bold and try grabbing you forcing you to escalate. Of course you want to avoid this as much as possible. If that’s the only option left and its either shoot or get killed, shoot the closest, most violent attacker first, quickly move to the second one and assess the situation before engaging again. One guy dropping after getting shot usually causes those around him to reconsider their actions. How cool and in control you remain will decide if they rush you or not, so you better know what you are doing and do your best to stay in control.

Maybe the most important thing to keep in mind regarding such a delicate situation is training. Proper training will be crucial so as to control the situation, have enough confidence, project that confidence towards the mob, and ultimately have self-control so as to know when to shoot and when not to. Untrained, nervous people are far more likely to mess up, maybe even accidentally shoot, effectively escalating the situation.
Get training, carry your weapon and stay calm!
FerFAL

Fernando “FerFAL” Aguirre is the author of “The Modern Survival Manual: Surviving the Economic Collapse” and “Bugging Out and Relocating: When Staying is not an Option”.

Nov 24, 2014

Breaking: Darren Wilson NOT Indicted

Ferguson

The grand jury in the Michael Brown shooting case has reached a decision.
On August 9, 2014, 18-year-old Michael Brown was fatally shot by Officer Darren Wilson in Ferguson, Missouri.
From USA Today:
A St. Louis County grand jury declined to indict officer Darren Wilson, 28, for firing six shots in an August confrontation that killed 18-year-old Michael Brown, said Benjamin Crump, an attorney for the family. The decision had been long awaited and followed rioting that resembled war-zone news footage in this predominantly black suburb of St. Louis.
“The jury was not inclined to indict on any charges,” Crump said after being informed of the decision by authorities. Prosecutors scheduled an news conference to announce the decision.
The 12-person grand jury had been considering whether probable cause existed to bring charges against Wilson, 28, the white officer who fatally shot Brown, an 18-year-old black man during their confrontation.
As we’ve been discussing for weeks, unrest is expected.
Just after the decision was announced, Brown’s family issued the following statement:
“We are profoundly disappointed that the killer of our child will not face the consequence of his actions.
While we understand that many others share our pain, we ask that you channel your frustration in ways that will make a positive change. We need to work together to fix the system that allowed this to happen.
Join with us in our campaign to ensure that every police officer working the streets in this country wears a body camera.
We respectfully ask that you please keep your protests peaceful. Answering violence with violence is not the appropriate reaction.
Let’s not just make noise, let’s make a difference.”
From ABC13:
The 12-person grand jury met in secret for months, hearing evidence from a wide variety of witnesses as it weighed whether Wilson’s should face charges on any of the five indictments he faced. At the lower end, the grand jury could have charged Wilson with second-degree involuntary manslaughter, which is defined as acting with criminal negligence to cause a death. The most serious charge would have been first-degree murder, which can be used only when someone knowingly causes a death after deliberation.
But of course, Wilson isn’t out of the woods yet, because the Justice Department is conducting an investigation into possible civil rights violations that could result in federal charges.
Delivered by The Daily Sheeple

http://www.thedailysheeple.com/breaking-darren-wilson-not-indicted_112014#sthash.4XJIvxFW.dpuf

Baking Bread and Why You Should Do It


Baking Bread and Why You Should Do It | Backdoor Survival

Oh boy.  The smell of fresh baked bread is amazing whether you are at the local bakery or in your own home.  Actually, fresh baked anything smells good but there is something special about that yeasty aroma created from the mixture of flour, water, yeast and salt.

I don’t know about you but here on San Juan Island, the cost of a freshly baked loaf of bread is over $5  and even the store-bought, mass produced stuff is almost $4 a loaf.  Crazy, no?  Well, we eat a lot of homemade Panini’s here in our house which means we go through a lot of bread but cripes, the cost can cripple my food budget.

A few years back I picked up the book Artisan Bread in Five Minutes a DayBaking Bread and Why You Should Do It | Backdoor Survival and never looked back.   (Well, I did have to look at the scale a few weeks later but that’s another story!)  In case you have not heard of this book, the basic process is to put some flour, yeast, water, and kosher salt in a bucket, let it rise for a couple of hours, then stash it away in the fridge for up to two weeks.  Whenever you want some bread, pull out a glob about the size of a grapefruit, shape it (no kneading), bake it, then eat it.

The first time I tried it my Mom was visiting and we ate the whole loaf shortly after it came out of the oven – it was that good.

Take a look at this video from the authors as they talk about the whole grain version of the bread from their book Healthy Bread in Five Minutes a DayBaking Bread and Why You Should Do It | Backdoor Survival.

Still not convinced?  Consider this.  When the doo doo hits the fan, the power is out, and all you have to cook with is a camp stove or barbeque, you can make this bread!  Really.  It cooks up swell in a closed grill and there is even a version that can be made on the top of a grill.  Talk about the ultimate comfort food.
More reasons?  (No worries, the basic recipe is below.)
1.  Baking your own bread saves money.  I have not run a precise calculation, but as far as I can tell, the cost is only 40 to 60 cents per loaf, depending in whether or not you purchase your ingredients in bulk or on sale.
2.  Homemade bread is healthier.  There are no fats (or very little), no chemical additives, no hydrogenated oils, no unhealthy preservatives, and no sugary sweeteners.
3.  Taste is king.  Homemade bread tastes better than store bought.  No contest.  Even boo boos taste good.
4.  The aroma is captivating,  Your house will smell good; this is the ultimate in aromatherapy.
5.  You friends, family and neighbors will be impressed.  Okay, maybe this is not important to you but you yourself will be impressed and that does count.
Ready for the master recipe?
The Master Recipe: Artisan Free Form Loaf.
From Artisan Bread in Five Minutes a Day: The Discovery that Revolutionizes Home Baking by Jeff Hertzberg and Zoe Francois (Thomas Dunne Books, 2007). Copyright 2007 by Jeff Hertzberg and Zoe Francois.
Makes four 1 pound loaves.
  • 3 cups lukewarm water
  • 1-1/2 tablespoons granulated yeast (about 1-1/2 packets)
  • 1-1/2 tablespoons kosher salt
  • 6-1/2 cups unsifted, unbleached flour, measured with the scoop & sweep method
  • Cornmeal for pizza peel or parchment paper
1. In a large bowl or plastic container, mix yeast and salt into 3 cups lukewarm water (about 100 degrees). Stir in flour, mixing until there are no dry patches. Dough will be quite loose. Cover, but not with an airtight lid. Let dough rise at room temperature 2 hours (or up to 5 hours).
2. Bake at this point or refrigerate, covered, for as long as two weeks. When ready to bake, sprinkle a little flour on dough and cut off a grapefruit-size piece with serrated knife. Turn dough in hands to lightly stretch surface, creating a rounded top and a lumpy bottom. Put dough on pizza peel sprinkled with cornmeal; let rest 40 minutes or up to 90 minutes. Repeat with remaining dough or refrigerate it.   (Or skip the peel and use parchment paper on a baking sheet.)
3. Place broiler pan on bottom of oven. Place baking stone on middle rack and turn oven to 450 degrees; heat stone at that temperature for 20 minutes.
4. Dust dough with flour, slash top with serrated or very sharp knife three times. Slide onto stone. Pour one cup hot water into broiler pan and shut oven quickly to trap steam. Bake until well browned, about 30 minutes. Cool completely.
Here are some of the breads I have made.
Baking Bread and Why You Should Do It | Backdoor SurvivalBaking Bread and Why You Should Do It | Backdoor SurvivalBaking Bread and Why You Should Do It | Backdoor SurvivalBaking Bread and Why You Should Do It | Backdoor SurvivalBaking Bread and Why You Should Do It | Backdoor SurvivalBaking Bread and Why You Should Do It | Backdoor Survival
It’s so simple, you just stir up a big batch of  dough (remember, you don’t have to knead it) put it in the refrigerator for up to two weeks, then when you want some bread, you take out a blob what ever size you want your loaf to be, and bake it up fresh.
It’s so easy!  You’ll amaze yourself at what you pulled out of your own oven-the bread looks like something you bought at a local bakery!
Enjoy your next adventure, wherever it takes you!
Gaye

The Survival Plan Done Right!

By Ski

Remember the number one rule of survival: When the disaster occurs, the time for preparation is over. Those who fail to plan have planned to fail. Planning and training allow you to overcome fear; both yours and others’ around you. Survival is not “water cooler politics” – where everyone runs their mouth about things they know nothing of – where they repeat endlessly what others told them while never thinking about it themselves. Survival requires thought, a plan. And that means writing it down.

In this post I will show how I wrote my survival plan; what considerations I judged to be important. You may find it looks similar to yours. You may find things you didn’t consider. You may have things on your plan which I missed. Excellent! That’s what this blog is for!

I’m still disgusted with the anonymous troll who last week told MD Creekmore, our generous host, to shut up and let the “government experts” decide what is right for others. I understand there are people who let the government do their thinking for them; who fail to take responsibility for themselves – but I do not understand why they do that.

I understand no matter how smart I think I am, there’s no way I’m smarter than all the readers of this blog put together. As far as I can see, the people reading this blog ARE the experts; and I welcome any input you graciously choose to share with me in the comments or a guest post. Thank you.

I am a military man. I can form and execute a plan. Others are experts in frugality. Others know gardening. Others know canning. Others can build a house, or maintain machinery, or weld. Others don’t know much, but they share their passion with others – motivating them. Each of us have something we’re good at. Together, we are the survivalists.

List of disasters

The first thing I did was write a list of disasters. I tried to simply write everything I could think of as fast as I could. This is brainstorming – creativity unrestrained by judgment. My list looked something like this; forest fire, national mass starvation, world wide nuclear war, radiological accident at the power plant, earthquake, car accident on the way home from work, house fire, city water being poisoned, poison chemical spill on the freeway or railroad, biological attack, a “natural” plague, Mexican uprising to take control of the southwestern states, random gang warfare on the streets, kid falls down and breaks a finger, an EMP attack by North Korea, civil disorder (Oakland/Los Angeles riots), foreign troops or government hired mercenaries “pacifying” US cities, US troops enforcing a new totalitarian rule (probably with a permanent state of emergency), city government stripping everyone of all rights (New Orleans), The Great Tribulation, hurricane, tornado, snowstorm, lightning storm, electrical grid collapse, kid burns herself with boiling water in the kitchen, and so on, and so on, and so on…

The next thing I did was some research. I looked for emergency/disaster advice. Turns out there’s quite a bit both online and pamphlets; American Red Cross, State Office of Emergency Management, Homeland Security, Fire Department, Nurses on Call, Poison Control Center, and many others. I printed out about twenty then added any disasters to my list they’d thought of that I hadn’t. I noticed all of them gave the same advice; food and water for three days , flashlights, blankets, etc…nothing specific. I also noticed Homeland Security was the only one that advised “one firearm per two adults and one box of ammunition per firearm”.

Lastly, I judged which of these disasters I might actually experience and which were so remote as to not even bother with. However, I did leave “outer space invasion” on my list; not because I think it possible (I don‘t), but because it was my way of reminding myself to think “outside the box”. I tried to see any blind spots on my list; anything I‘d missed without realizing it.

List of effects on my family

As a husband and father, I am responsible for providing for my family. I tried to logically deduce what the effect of each of these disasters/emergencies would be on my family as a whole and as individuals. I considered both the physical and spiritual effects. Boredom and hopelessness lead to mistakes that kill just as dead as thirst or violence. This was the part of my plan that required the most thought and work. As I wrote all this data down in one place, I quickly realized that many disasters all had the same effects on my family and thus all have the same mitigation. Which is why these Survival Tips begin with the three survival necessities; clothes, water, food. With those three covered, there is at least a chance to respond to whatever new challenge awaits us. Once finished, I tried to look at the list backwards. Instead of disasters driving needs, I listed human needs when no disaster threatens. I came up with the same three; clothes, water, food. When I work a math problem forwards and backwards and get the same answer both ways, I know I have the right answer. So, that is where my preparations began.

Mitigations for each effect

Until I tried to see the totality of the possible problems, there was no way I could arrive at a correct solution. But, as my risks are different than yours, your solution must be different than mine. Perhaps you have no risk of forest fire because you live in a desert. Perhaps there is no nuclear power plant within 20 miles of your home. Perhaps there IS a hazardous chemical using manufacturing plant within 10 miles of your home you don’t know about – have you looked? Once you see the risks written down in front of you, the list of mitigations writes itself: Starvation requires food. Poisoned water requires a good water filter.

Devastating earthquake requires an escape plan with a predesignated family meet up place, knowing how to turn off the gas, water, and electricity, tents and sleeping bags. An EMP attack by North Korea requires…uh…a web search to learn something about EMP. Hey, this is easy. I see ‘first aid’ keeps coming up again and again on my list… Mitigations come in two types; equipment and training. Buying equipment is fun! The only difference between men and boys is the price of their toys…that is SO true! A smart girl can use this.

Who wouldn’t want to own a water filter and two canteens with a nifty backpack to carry them in? Isn’t having three months of canned foods all boxed and labeled under the stairs just the coolest! (Well, I think so…) This is where the 10% rule really works for you! If you’re loaded with cash such that you can buy everything you want all at once, you don’t need to read Survival Tip #1 again. Training is sometimes the more immediately useful of the two.

The family needs to understand everyone should have some minimum amount of training. Red Cross Basic First Aid is probably the best place to start. The fire escape plan; when our kids were little, we used to practice this every three months. Your plan may include such things as a family meet up place, firearm safety – Eddie Eagle can help little kids with that, where the emergency supplies are and how to use each of them. You must decide what threats you will train your family against. You cannot train them against everything. Prioritize, and remember there are outside resources…use them.

Red Cross Basic First Aid is my favorite example because it’s usable in life’s many little emergencies, and is available just about everywhere. My wife saved a man’s life two days after her first aid class (that her mean ‘ol husband made her take even though she didn‘t want to) when she was the only one in the restaurant who knew how to do the Heimlich maneuver. I explained to her having a husband who is an EMT is useless if her husband is the one who is hurt and needs help. Don’t you love me? That other fellow gained the benefit and my wife gained some real confidence.

Both of my daughters have used the karate their dad taught them; public schools are so screwed up! But the point is: training is useful. I was looking down a list of skills a book said survivalists should have and realized I have almost all of them except welding. This is when my wife informs me she can weld; learned it in a college automotive course. I didn’t know that! Your plan will show you what training you need. Discussing the plan with your family will help you decide who needs to be trained in what. Remember, this is your plan – think for yourself. The only wrong answer is not to plan, not to prepare, not to train.

Any other answer is an improvement over where you are now. Training should include whoever you include in your survival plan; your brother who lives outside the city, your old army buddy who lives across town – whoever. Survivalists should not plan to face the starving mobs alone. You should try to find half a dozen others in your area and at least explore the idea of working as a team. You might consider starting a neighborhood watch program of like minded individuals. Impromptu survival groups sure worked for those store owners during the Oakland riots! And it sure worked for the two neighborhoods in New Orleans who did it! What!?

You didn’t see anything about that on the news? Me neither. I learned about it from some FEMA folks who were there. If you want some free training, consider joining your local volunteer fire department, or a volunteer search and rescue team, or a Red Cross CERT Team, or the Scouts, or a Mountain Man club. Just get out of your easy chair and join something! The best camping gear and guns are useless if you don’t have the physical strength to carry them. Lastly, training can be fun. My wife and I love camping. She loves cooking over an open fire, and gets a kick out of filtering water from the stream, and trying to find wild foods while we’re hiking.

But training!? Oh, she has no interest in training. A smart man can use this. I just wish I could have photographed her expression when I informed her we were going camping at the top of the mountains in January. But once we got there she realized we could hike through the snow, pitch a tent, spend the night, and…we had the whole state park to ourselves. The confidence she gained was life changing. And she now understands what all the camping gear does because she actually used it. I enjoy listening to her brag about our exploits to others. And I learned I have too much winter gear because it doesn’t get that cold where I live.

For those who are couch potatoes (you know who you are), try walking around the block – just around the block – once each day. Add one block – just one block – every Monday. You can do this. And you’ll be glad you did. Length of time How long do you plan to survive on your own? Not surprisingly, every survivalist gives a different answer. I figure there are three durations that actually mean something: 1)“Until help arrives” means somewhere between three days to two weeks. 2)“Through the winter” means four months. 2)“TEOTWAWKI” means three and one half years. Pick whichever answer is right for you.

But, I suggest you pick two weeks. When you’ve achieved it, then go for four months, then pursue whatever level of paranoia…err…preparedness you think is right for you. I am over one year and slowly climbing. Establish & maintenance Buying equipment is fun. But not worth much without training. Training is not worth much if your equipment breaks when you unpack it after years and years having never used it. The solution is what the military calls a maintenance schedule . Being a firm believer in the KISS method (Keep It Simple, Stupid), I chose one day a year to open, inspect, maintain, and replace my survival equipment.

I chose St. Crispin’s Day. This is why: Video. The fact that St. Crispin’s Day is the day after UN day also appeals to me for some reason I can’t quite put my finger on. Maybe, it’s just the hope American liberty will outlast the evil that is coming. Another method might be for the whole family to open and inspect each individual’s equipment the day after their birthday.

This gives an excuse for repetition, which is the key ingredient in learning. However you decide to choose a date/frequency to maintain your survival equipment, this means taking it out of the box, looking at it, putting it together, inspecting that it works, talking about how each piece is used, playing with it a bit, inspect expiration dates replacing any that are expired, putting it back away, updating the calendar with the next inspection date. As a general rule sealed medicines are good for two years, unsealed medicines are good for one year, batteries are changed every year, MREs are good for seven years (ten years under ideal cool, dry conditions), canned foods are good until the can rusts.

Your survival supplies will have to be stored in a safe (for the equipment) manner. Accessible in an emergency; but not so accessible it gets used routinely, because then we forget to replace it. In your subterranean bomb shelter under your house works best. You don’t have one!? Well, that hard to get into space under the stairs, or a corner in the basement works almost as well.

Anyplace that is dry, and not too hot. Attics are usually not a good choice, nor the garage because they’re subject to wide temperature and moisture variations. When does survivalism become too much? Survivalism becomes too much when you can’t laugh at yourself anymore. I realize others think I’m a kook. But I still laugh with my fellow survivalist kooks. As long as we’re still laughing with and at each other, we’re OK. Survivalism is important but it is not the most important thing in your life – God is; followed closely by family, then freedom, then way down the list somewhere a job.

Survivalism is too much when you’re so consumed with preparations for tomorrow’s disaster you no longer enjoy the goodness of today’s calm. Don’t be so focused on the goal that you miss the journey. Survivalism can be fun. Say to your wife: You’re right dear. I need a break from all this doom and gloom…let’s go swimming! Invest 10% of your money and 10% of your time preparing, then go outside in the sun and have some fun. Play baseball with the kids, make dinner for your wife. These things are important! Never forget to enjoy life.

You’ve made your plan, you’re adding something to your stash every payday, you are preparing as a reasonable, responsible adult should, now go relax. The Bible says “All things in moderation” – that is good advice. The world will end at the time appointed – not before, not after. But that time has not come today. Is there anything…anyone…more important to you than your own life? Can you think of anyone for whom you will willingly lay down your life? If there is someone who is that important to you – tell them today! Spend time with them today. If you forgot to do so, you have crossed the line between survivalist and kook. Your survivalism has become too much. Take a step back. There is still good all around you. May the Lord bless you.

http://www.thesurvivalistblog.net/the-survival-plan-done-right/

How to create a fully off-grid indoor food production system

food production

(NaturalNews) Times are changing, dramatically. The age-old certainty of the supermarkets being open 24 hours a day, everyday, is just one minor cataclysm away. With the current state of global instability, the threat of wars on our own shores, pandemic outbreaks and financial crisis seem ever more real. Only when there is no food to eat will people realize that they can't eat money...

This is not intended to scare anyone, but maybe it's time to consider some self-preparation?

For relatively little financial investment, one can create a fully off-grid indoor food production system, with two main components. One certainty for millennia now is that the sun will rise and set everyday, providing an indefinite power source. The other component is aquaponics. (Read more here to learn what aquaponics is: NaturalNews.com.)

A solar-powered aquaponic grow room can provide fish and veggies for as long as needed when the zombie apocalypse arrives. It does, however, take a little time to set up and refine, so if growing your own organic fish and food sounds appealing, there's no better time than right now to get started.

First, you'll need the space to set up the room. A well-lit room with windows is a good start; however, if you can get a hold of some sunlight grow lights, a garage would work perfectly. You will need a large aquarium to hold the fish (talapia, trout, catfish, prawns, snails etc.) and grow trays or vertical towers to grow the veggies in. A bio filter to break down the fish waste is a must-have, and a few pipes and pumps will circulate the water into the grow beds. The beauty of this system is that the longer it runs, the better it performs. Once the beneficial bacteria numbers reach a certain point, they break down the fish waste into most of the nutrients that the plants need to grow and flourish, thus eliminating the need to add expensive nutrients to the system. Since the water is also always circulating through the plant roots, it is cleaned and recycled, creating a closed water system with very little top-off needed. Within a few months, veggies can be harvested, and within 9-12 months, you can start to eat the fish in the system. At this point, they should also be reproducing, so you should have a renewable source of fish, and if you let some of the plants go to seed, you should have plenty of seeds for the next harvest. As long as you keep an eye on the solar power system and ensure that the pipes and pumps are clear and working correctly, this system should run for years!

It really doesn't take a lot of scientific know-how to set something like this up; it really just takes the desire to be self-sufficient!

Sources:

http://theaquaponicsource.com/

http://www.growingpower.org


http://www.naturalnews.com/047767_aquaponics_food_production_off-grid.html#ixzz3Jz6I7I95

Nov 22, 2014

Building and Operating a Makeshift Wood Oven

The following article was originally published back in July of 2011 – it can be seen in its original form HERE. This is another examples of some of the best articles published over the past few years on ModernSurvivalOnline.   – – Rourke

By Ken B
Introduction
One of the basic needs for any survival situation is a means of cooking food.

The most abundant fuel available is wood.  There are many ways to use wood to cook food…the most common being a camp fire or the “rocket stove”.  However, these methods are not the most fuel efficient, and a lot of heat is lost during cooking, resulting in excessive fuel consumption.

A more fuel efficient method is to build a wood fuel oven.  A wood fuel oven can be made out of a variety of materials…metal, brick, or cinder blocks are ideal, as long as you can make the oven air tight.
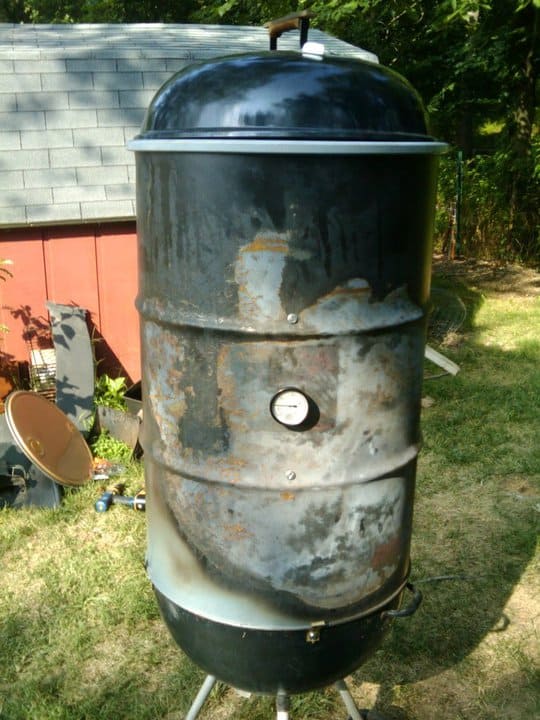
smoker, survival stove, oven, SHTF, TSHTF, TEOTWAWKI, economic collapse, food storage
Smoker

Understanding How Fire “Breathes”
Before building your oven, it’s important to understand the three aspects which regulate the burn rate and temperature of fire:
1) Available fuel
2) Escape rate of exhaust (smoke)
3) Available oxygen

Much like a car engine, the performance of your oven will vary based upon how well you regulate the above three components.

Smoke should be channeled away from your fire rapidly to prevent the fire from choking on its own exhaust.  Restricting the flow of smoke out of the oven should never be used to regulate the fire.  Excessive smoke in your oven will make food taste bitter.  However, allowing smoke to escape too quickly will also allow heat to escape quicker, reducing the ability of your oven to retain heat and conserve fuel.

Most traditional non-electric cooking and heating appliances work by regulating the flow of fuel.  However, unless working with a pellet stove, it is rather difficult to regulate the “flow” of wood.

That leaves us with the only remaining aspect of fire, oxygen.
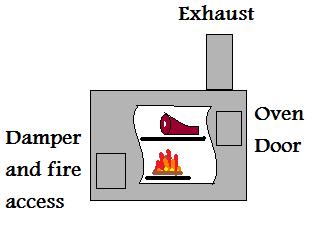
This can be controlled by creating a damper which will restrict the flow of oxygen into the oven.

Gathering the Parts
You need the following components to build your oven:
Oven Chamber
Thermometer
Fire Box/Grate
Food Rack(s)
Damper
Exhaust Door/Lid
Oven Door
Depending on materials: assorted hardware, exhaust pipe
 wood stove, survival oven, preparedness
Oven chamber
As mentioned previously, the oven can be built out of many different materials.  Suggested materials include: Food grade 55 gallon drum, old charcoal kettle grill, brick and mortar, cinder blocks and mortar, or even a cardboard box lined with aluminum foil.  When all doors/dampers/etc are closed, the oven needs to be air tight, so that you can extinguish the fire when you are finished cooking without having to pour water over the fire.

Thermometer
A standard oven or grill thermometer.  One of the “dial” thermometers which have a metal probe and do not contain mercury.

Fire box/grate
The fire box/grate should be elevated so that ash from the burning wood can fall below the fire and prevent smothering the burning wood and preventing the flow of oxygen.

Food rack
The food rack should also be elevated, and can be placed either above or next to the fire box.  A grill rack out of a propane grill works great for this.

Air Damper
The damper should be adjustable, but can be rather simplistic, such as a sliding piece of metal.  For optimal air flow the damper should allow oxygen to flow into the oven from beneath the fire, or on the opposite side of the oven from the exhaust and food rack.  The important thing is that the damper is adjustable, and makes the oven air tight when closed.  If need be, the damper can also double as an access door to the fire box.

Exhaust door/lid
The exhaust door/lid, much like the damper, can be simplistic, such as a sliding piece of metal.  Once again, the important thing is that the exhaust door/lid is adjustable, and makes the oven air tight when closed.

Oven door
The oven door should be large enough and located in a position to pull your food in and out with ease.  When closed, the door should make the oven air tight.

Miscellaneous hardware
It’s important not to forget all the hardware you’ll need to assemble your makeshift oven.  This includes screws, nuts, bolts, nails, etc.

Assembling your Oven
When assembling your oven, the location of all components is critical.  Your oven should encourage proper air flow by locating the air damper and exhaust door/lid on opposite sides of the oven, as pictured.  Your damper should always be as low as possible, and the exhaust should be at the highest part of the oven.  Remember, smoke (and heat) rises.

Try to design the oven so that while the entire oven is filled with heat, the smoke is quickly channeled around and away from the food.  Your fire should always be offset from your food.  This will not only prevent the food from becoming bitter with too much smoke flavor, it will also help prevent the food from burning.

Your thermometer should be level with your food, so that you can monitor the cooking temperature.

Finally, and I can’t reinforce this enough, make sure that when all doors/lids/vents/etc are closed, the oven is as air tight as possible.

Using your Oven
The makeshift wood oven is very similar to the operation of a conventional oven…warm up the oven, put the food in, wait, pull the food out of the oven when done, and turn off the oven.

First, stack your wood inside the oven on the wood grate.  Generally, stacking the wood in a crisscross square is best for long burns.  Use a small starter log stick for easiest starting of the fire.  Starting off, you’ll want your air damper and exhaust wide open for maximum air flow when lighting the fire and warming up the oven.  If you find it takes a long time to warm up, you may want to try closing your exhaust partially to help retain heat.

Monitor your thermometer.  When the temperature is where you want it, close your air damper most of the way, only allowing a small amount of air into the oven.  Also partially close your exhaust to help retain heat.  While it takes a large amount of oxygen to get your oven warmed up, it won’t take very much at all to maintain your temperature.

Keeping your oven running will require constant supervision until you get the hang of it.  Every makeshift oven is different, and will require a lot of trial and error.  Put in your food, and keep an eye on the temperature.  If the temperature starts falling, open the air damper more, allowing additional oxygen to reach the fire, and close your exhaust slightly.  If the temperature keeps rising, close your air damper more.  Keep an eye on the edges of your oven door…if you see smoke starting to come out, open your exhaust more.  The idea is, keep the smoke flowing out of the oven, but keep as much of the heat in as possible.  Just like a regular oven, keep the oven door closed as much as possible, to keep the heat in.  A general rule I’ve found is that exhaust should be double the size of the air damper.

It helps to have a temperature probe handy, so you can check the internal temperature of your food.  Making sure your food has reached the minimum internal temperature is critical, otherwise your food may make you ill.

When you are finished with your oven, turn if “off” by closing all doors/vents/lids/etc.  Normally I will leave the oven in the closed state until I’m ready to use it again.

Caring for your Oven
When cleaning your oven, be sure not to use any harmful chemicals.  Generally, water and soap should be sufficient to clean your oven.  You may notice over time a black soot buildup inside your oven.  This is okay, as the soot will help to “season” the oven, and actually make your food taste better.

If you know you won’t be using your oven for a long time, it is advisable to completely wash and dry the oven after it has cooled, then store it in an airtight plastic bag to prevent dust or mold.  Always wash and dry the oven again after removing it from storage.

I hope that you have found this useful.  These oven plans have been adapted from the “Ugly Drum Smoker” and uses a similar cooking technique.  My custom built smoker uses this design, and can be used as a charcoal smoker or a wood oven.