Showing posts with label pressure canning. Show all posts

Jul 26, 2015

Water Bath Canning Versus Pressure Canning: There is a Deadly Difference


Water Bath Canning VS Pressure Canning
The botulinum bacteria if left to grow will produce spores and create a deadly toxin that can result in food borne botulism. The bacterium, “C. botulinum” is present in soil and in marine sediment. The spores can be found on many fruits and vegetables, but the spores are harmless at this stage, because to grow …

Mar 22, 2015

Avoiding common canning mistakes

By Jackie Clay-Atkinson

Canning has been an important part of my life since I was a young girl helping my mother and grandmother can in our Detroit basement. I loved the smell of fresh peaches simmering in syrup and the pungent spices used for making pickles. I loved going out in the garden and picking fresh fruit, cucumbers, and tomatoes. I also loved our family weekend outings in the country, picking up boxes and baskets of foods to can from roadside markets and farmers' trucks.
In growing up with relatives who experienced the Depression, I soon realized what a wonderful thing it was to have a pantry chock-full of all sorts of foods to "see us by." Once properly canned and stored in the pantry, any food not eaten during the winter will remain good for years, without losing any of its gourmet taste or nutrition.
Ever since then, I've made home canning an important part of my quest for a self-reliant lifestyle. And, boy-oh-boy, have I canned a wide variety of foods! From pickles, jams, jellies, and preserves to venison, pork, beef, chicken, meals-in-a-jar, stews, soups, and nutmeats— I've canned them all.
I love teaching others about canning. For more information, check out my book, Growing and Canning Your Own Food, my "Ask Jackie" column in BHM, and my blog. I even host seminars here at our homestead. Truthfully, I think everyone who is able should learn how to can. It is an easy, enjoyable, and frugal thing to do.
Throughout the years, I've found that there are certain common mistakes that folks (me included) have made. Over and over, I've heard "I did this and this, and then my food turned out bad." I really hate for this to happen because some people just chuck out the whole idea of canning right then and there. So, here are a few mistakes that home canners make and some advice on how to fix these mistakes.

The pressure canner blew up!

There's always a story floating around that someone's mother, aunt, or neighbor had a pressure canner that blew up in the kitchen, blowing food and glass everywhere. All I can say is, "Yeah, right..." I hear this all the time. It's the most frequently-given reason why folks don't want to try pressure canning.
Let me say here and now that it is nearly impossible for a modern pressure canner to blow up. Modern pressure canners (those built within the last 40 years or so) are equipped with at least one fool-proof safety device— a petcock. The petcock releases steam and pressure when it gets over 15 pounds and has a hard rubber plug that pops out if the pressure gets too high. In addition, many canners, such as the All American, come with both a dial and weight. If the pressure gets too high, the weight jiggles and releases steam and pressure. No blowing up.
You do need to monitor your pressure canner while it is building pressure and during processing. Like a deep fryer, you don't just fill it and go in the other room or outside while it is doing its thing. (A long time ago, my oldest daughters decided to make French fries, so they put the potatoes in the deep fryer and went outside to sunbathe. Needless to say, they ended up having to call the fire department.) You need to monitor your canner's pressure— stay in the same room! If you want to ready another batch of food to can, that's perfectly fine. But check often to make sure the pressure isn't climbing past the pressure you are processing your food with.
As an added safety precaution, be sure to always check your petcock and steam vents before you can. Run a needle through them to make sure a bit of food hasn't blown out of a jar and gotten wedged in the vent. In the past, this is usually what blew up the old canners without safety features. The plugged vent let the steam pressure build up until the lid blew off. Again, with modern canners, this is nearly impossible.
Always use a rack to prevent the jars from coming in contact with excessive heat from the burner. If you don't, the bottom of the jar may break out!

The bottoms broke out of my jars

This commonly happens during water bath canning. The reason is simple: hot jars put into a cool canner or cool jars put into a boiling canner make the bottoms of the jars crack and break during processing. Always make sure your jars are hot and the canner a little below boiling before you put them together. You can hold your jars in another canner full of boiling water or even hold them in a sink full of hot water so they stay reliably hot. Then pack them quickly and put them into a very warm canner. Even when pressure canning, I always take the time to heat my canner a bit so I'm not putting hot jars of food into a cold canner. By doing this simple step, I have no jar bottoms break during processing.
Another cause of broken jars is setting your jars of hot, processed food directly on a kitchen counter or table to cool. Setting them near an open window with a cool breeze blowing on them will also cause breakage. So will canning outdoors and putting the hot jars, right out of the canner, on a table in a windy area. Make sure there is no wind or breeze, and always set your hot jars on a clean, dry towel and they will cool safely ... in one piece!
Tunking jars together while very hot can result in broken jars. The jars should also have enough space between them to create a good airflow. A good airflow results in a good seal.

Liquid blowing out of jars

Liquid blowing out of jars during canning can happen for a couple of reasons. The first and most common reason is letting the pressure vary during processing. Let's say you are canning at 12 pounds pressure but it slips up to 15 pounds before you notice it. If you quickly turn off the heat and let it go to 12 pounds, then turn the heat back on a couple of times, this can cause liquid to blow out of the jars. It is better to slowly bring it back to the right pressure.
Opening the canner too soon after processing or bumping the weight a couple times to "hurry" things up will also cause liquid to blow out of the jars. Once the pressure goes back to zero after your batch of jars has processed fully, wait five minutes or so. Then release any steam and remove the lid of the canner. Don't try to save jars by over-packing food. Filling the jars past the recommended headspace will also cause liquid to blow out.
Although unsightly, the food in jars with a low liquid level is perfectly good to eat. A low liquid level does not affect the shelf life or the taste of the food.

My jars didn't seal

Having a couple of jars that don't seal in a big batch of canning is nothing to be concerned about. Reprocessing it is easy. Just reheat the food, check the jar rim for nicks or food particles, use a new, previously-simmered lid, and re-process within 24 hours. Or, you can just refrigerate it and eat it.
However, if more than one or two jars fail to seal, there is a definite reason. And the most common reason is not reading directions. Canning is definitely not rocket science, but you do need to follow tested recipes and the directions for every food, every time you can it. Never rely on memory. Even with all my experience, I always open my canning book and read the directions before I can that particular food. It's a good habit to get into. And you'll have fewer failures along the way if you do.
One other thing we thought of that quite a few folks have done wrong, including my oldest son, Bill, is to begin counting the processing time in a water bath canner from the time they put the jars into the canner. This is wrong and can result in failed seals, mold, or fermenting foods. The time should always begin when the canner full of jars comes to a full rolling boil.
Examine every jar before you fill them to check for nicks or cracks in the rim of the jar. Always be sure to wipe the rim of your filled jars with a damp, clean cloth to remove any food bits or grease before putting on your lids. When they are done processing, do not wipe the jars and lids before they are cooled. If you have minerals in your water, your jars may have a whitish film on them after they come out of the canner. This film is nothing to worry about, but some folks take a towel and wipe it off before the jars have cooled. The lids will not seal properly if you do this. Wait until the jars have cooled completely, then you can take off the rings and wash the jars thoroughly under warm, soapy water with no ill effect.
When your batch of jars are through with their processing time, let the gauge return to zero or let the canner cool so there is no remaining steam if using a weight only. But do not leave the lid on the canner overnight and assume that the jars will seal just fine. Sometimes they appear to seal, but in storage, the seal releases and the food spoils. Again, read the directions and follow them. When the book says "let the gauge return to zero or allow the canner to cool naturally then remove the lid and remove the jars," do just that. It does not say to leave them for several hours in the cooled canner!
Be sure to put your hot, processed jars onto a folded, dry towel away from cool breezes. Setting hot jars onto a wet towel, on a bare countertop, or next to an open window can cause broken jars.

My grandmother water bathed green beans

Years ago, home pressure canners weren't readily available, so people did process foods such as vegetables and even meats by holding them in a boiling water bath canner for three hours. That usually caused the jars to seal, although the food was terribly overcooked. But, no matter how long you hold jars of food in a water bath canner, the temperature of the food in the jars never reaches above boiling.
Boiling temperatures kill molds and yeast, along with some forms of bacteria. But it does not kill the bacteria that cause botulism (food poisoning) or their toxins. So you could boil your green beans for three hours in a water bath canner and still have toxic food in your pantry, even though the jars had sealed. To kill these bacteria, food in your jars must reach 240 degrees— a temperature which is only reached inside a steam pressure canner.
No, botulism is not common in this country, but it does occur. Do you really want to gamble your family's safety by continuing an unsafe canning practice? Again, always read the directions (from a modern canning book) for each and every food you can. All low-acid foods, including vegetables, meats, poultry, and fish (and recipes including them) must be processed in a pressure canner.

Can I reduce the processing time if I boil foods first?

Any time you can up a batch of food, you have to treat it as if you had just mixed it up fresh. This goes for your own recipes of chili, soup, and stew, as well as when you re-can large #10 cans (institutional size) from the store. It's always possible for bacteria to float into that food between cooking and canning. So to be safe, you must process that food as though it were made up fresh and follow the processing directions exactly in your canning book. If you don't, you'll have incompletely processed food that may go bad during storage or expose your family to the danger of food poisoning.

My sweet corn turned brown during canning

There are a couple of reasons why corn turns an unappetizing brown after processing. The most common is that the corn is one of the newer super-sweet varieties. Plant or buy a variety of corn that is not "extra sweet" or "unbelievably sweet." One popular variety sold is Kandy Korn, a super-sweet best seller. It is very good, eaten fresh. But it is a poor choice to can. I've done it with mixed results; some batches are fine, others turn brown.
Another possibility is that the corn was processed at too high a temperature. This often happens when a person fails to monitor the pressure gauge while the corn is processing. If you should be processing at 10 pounds pressure, don't assume that 15 will make it "better."
Make sure that water covers the corn well and that you use the correct headspace recommendations.
If you do end up with unappetizing brown corn, it is fine to eat. Most folks won't want to eat it as a side dish because of its appearance, so just use it in your recipes.

My jelly didn't set up

This just happens sometimes, even with the most experienced jam and jelly preservers, me included. Personally, I don't worry about it and just use the unset spread as syrup over pancakes or ice cream. It's sweet, fruity, and thick enough not to be runny.
I think the most common reason it doesn't set is from tweaking the recipe in your canning book. Don't add extra fruit juice to your recipe, thinking that you can get away with adding a little more sugar. It never works out and you'll be disappointed with unset spreads.
Whether you use a recipe with pectin or not, don't hurry the boiling of your spread. If your recipe calls for added pectin, add the full amount. Never double a recipe. It often does not turn out well; either it doesn't set up or it scorches.
If you've done everything right and the preserve still doesn't jell, you can save it and remake it again to get a firmer product. Before re-canning, just remember, some fruit preserves and jellies take up to two weeks to set up. And some fruits, such as chokecherries, are a bugger to set. Whenever I start to cook down my chokecherries, I use apple juice as a liquid, not water. The apple juice is high in natural pectin and helps the chokecherry jam or jelly to set. I also add powdered pectin.
If you want to remake your jam, jelly, or preserves that have not set up after two weeks, here's how:
Spreads made with powdered pectin, such as Sure-Jel:
To remake failed jelly or jam, only do 8 pints at one time. For each cup of spread, measure 1½ tsp. powdered pectin, 1 Tbsp. water, and 2 Tbsp. sugar. Set sugar aside in a separate bowl. Combine pectin and water in a large saucepan and bring to a boil, stirring constantly to prevent scorching. Bring the pectin and water to a boil over medium heat, stirring frequently to prevent scorching. Add unset preserves (or jam or jelly) and sugar, stirring constantly to prevent scorching and to mix thoroughly with pectin mixture. Bring to a hard boil for 30 seconds. Quickly ladle into hot jars, leaving¼ inch of headspace. Place a hot, new, previously-simmered lid on jar and screw down the ring firmly tight. Process in a water bath canner for the time shown in the original recipe.
Spreads made with liquid pectin, such as Certo:
To remake failed jelly or jam which has been made with liquid pectin, only do 8 pints at one time. For each cup of unset jelly, measure out 1½ tsp. liquid pectin, 3 Tbsp. sugar, and 1½ tsp. lemon juice. Place failed preserves (or jam or jelly) in a large saucepan and bring to a boil, stirring constantly to prevent scorching. Quickly stir in sugar, lemon juice, and liquid pectin. Return to rolling boil, stirring constantly. Boil hard for one minute, stirring constantly. Remove from heat. Ladle hot jam/jelly into hot jars, leaving¼ inch of headspace. Place a new, hot, previously-simmered lid on the jar and screw down the ring firmly tight. Process in a boiling water bath canner for the time required in the original recipe.
Without added pectin (boiled down jam, jelly, or preserves):
Usually when these don't set, it means you haven't read or followed the directions correctly. Read them again and recheck your method. If it still seems right, heat the unset product in a large pot until the temperature in the recipe is reached or the jelling point is reached. Be sure the preserves slide off a clean spoon in a sheet instead of dripping off in drips. Then quickly ladle the spread into hot jars, leaving¼ inch of headspace. Place a hot, new, previously-simmered lid on the jar and screw down the ring firmly tight. Process in a water bath canner for the time required in the original recipe.
Cracks and nicks in the jar rim are a common cause of seal failures. Here, I'm checking each jar rim carefully with my finger. Be careful; sometimes nicks in the glass are sharp!

My jars have come unsealed during storage

This happens once in a while, but it should not happen very often. If more than one jar in a large batch comes unsealed, or this starts happening frequently, you have a problem.
The most common cause is that food bits have been trapped under the lid during processing. Be sure to wipe both the rim of the jar and the threads to remove any clinging food particles before putting the lid on the jar. Another cause of food getting trapped under the lid is varying pressure during canning which often blows liquid and small food particles out of the jar during processing. These particles sometimes lodge under the lid and around the rim of the jar, causing seal failure either right away or later on.
Another common cause is, again, not following directions. If the food has not been processed for the correct time, it won't stay sealed. Never take shortcuts, thinking that 30 minutes is as good as 40 minutes in a pressure canner. Or thinking that because a soup was put into the jars boiling hot, it doesn't need to be processed as long as if it were not previously boiled.
Another common cause of seal failure in storage is packing food too tightly into a jar, not using the recommended headspace. The food swells during processing and touches the underside of the lid, sometimes causing seal failure in storage.
Not removing air trapped in the liquid when you pack your jars will also cause seals to fail in storage. Take the time to slide a plastic or wooden spatula or chopstick down inside the jars to release any air bubbles.
Finally, when the processing time is finished, don't leave the jars in the pressure canner with the lid on. I did that once because I was exhausted from a 36-hour canning session. I left a big batch in the canner, turned off the heat, and went to bed. The next day, every one of those jars of sweet corn seemed sealed, so I put them into the basement. Two weeks later, I started to smell a stink in the basement. The seals had all failed— I threw out 9 quarts and 14 pints of spoiled corn. I've never done that again!
Incorrectly exhausting steam before shutting your pressure canner can also lead to food spoilage. Most canners require 10 minutes of steady steam escaping from the vent before you begin processing by flipping down your petcock or putting your weight in place. The steam should not come out in spurts; it should be steady and vigorous. If you shut your canner too soon, the food often will not heat for long enough during processing and can spoil in storage even if the lid appears sealed.

My fruit or tomatoes are floating in liquid in the jars

This is nothing to worry about, although many beginning home canners are distressed to find this happening. The fruit crowds near the top of the jar with lots of syrup or juice below it. Raw packing the fruit is generally what causes this. If you simply heat your fruit (or tomatoes) in their syrup or juice, they won't float in the jars. Be sure to pack your fruit well without smashing it into your jars. The fruit will slightly shrink in processing.

My pickles are shriveled

This most often happens when you can whole pickles, usually sweet gherkin type pickles. There are two common causes of shriveled pickles. The first cause is that too much sugar was added to the cucumbers at one time. Follow your recipe to the letter and add the sugar over the period of time indicated. The second cause is not pricking the cucumbers with a fork before soaking them in the brine. Pricking lets the brine penetrate each cucumber, plumping it up during brining.
This condition is unappealing, but the pickles are still edible and usually quite tasty.

My pickles are soft and limp

There are several reasons that pickles get soft after processing. I believe the most common is boiling them too long. Refrigerated cukes are nice and crisp, but those left on the counter at room temperature are limp and wrinkled. Pick a recipe that requires little to no boiling before packing and a very short time in a boiling water bath canner. Grandma's best pickle recipes required no water bath processing and the pickles were always sealed and crisp. They were packed cold in the jars then the boiling brine was poured quickly over them and the lids and rings were fastened in place. Every jar sealed and remained sealed. Today, to keep us absolutely safe from any possible food-borne illness, experts now recommend processing all pickles in a boiling water bath— some for as little as 5 minutes and most for 10 or even 15 minutes. The longer you boil pickles, the softer they tend to get. Some folks add grape leaves or powdered alum (pickle-crisp) to the pickles to help them stay crisp, with varying results.
Another cause of limp pickles is not removing the blossom end (as opposed to the stem end) of each cucumber as it is prepared. Be sure to trim it off completely to remove any bacteria or mold-causing organisms present.
Using weak vinegar or a brine that is too weak (often made so by adding water) also causes limp pickles. Be sure to cover all of your pickles in the jar with brine. Those that stick up out of the brine will become soft and soggy. Only use 5% acidity vinegar in the brine. If you use homemade vinegar, test it to make sure it is strong enough to use in pickling. Also, use pickling salt, not common table salt. Table salt contains iodine, a necessary supplement to diets, but it can cause pickles to get soft or discolored.
Using other-than-fresh cucumbers is another very common reason for pickles going limp. Always pick your cucumbers just before pickling and be sure to wash them thoroughly. I store mine before processing in a large bowl full of cold water.

The food in my jars is getting discolored and pale

This is common when home-canned food is stored in conditions with too much heat and/or light present. An attic is very warm in the summer months and if you have windows in the attic, the light, coupled with heat, will discolor your food. Canned foods should be stored in a dark, cool location, such as a dry basement that is not subject to freezing temperatures. The discolored food looks unappetizing and may soften (especially fruit), but as long as the jars remain sealed, the food should be okay to use.
Even though I've canned for more than 45 years, I always get out a canning book. It's too easy to forget a step or process.

My rings and lids are getting rusty

Condensation in a damp basement can and does cause canning jar rings and lids to rust. I had this problem in the farmhouse basement we used, years ago. By simply adding a dehumidifier to our storage area, then using a small wood stove down in the basement in the winter months, my problem was solved completely.
But there can be another common cause of jar lids and rings rusting. Did you know that jars store much better if the rings are taken off of the jars before storage? Most folks just take the cooled jars to their pantry after processing. Instead, you can do what I do (what you're supposed to do) and remove the rings and wash the jars off with warm soapy water when they are cool. During processing, food juices often blow out of the jar and lodge between the ring and the jar threads. If you don't remove the ring and wash the jar, this remains during storage and attracts moisture, which rusts the rings and the lids. These lids eventually rust through and spoil the food. When washed, the lids last years longer.
I do sometimes store my jars with the rings on to save storage space for the rings, but I always remove the ring, wash and dry the jar, then put the ring back on.
Some people fear that if they remove the ring, the jar will come unsealed and the food ruined. This is not true. If the jar is properly sealed, removing the ring never lets the seal come undone.

My Tattler reusable jar lids don't seal reliably

Some people try the Tattler reusable canning lids and don't read the directions on the box. Or they have older jars with difficult-to-understand directions on the box. They use the lids just like they do regular lids, and that doesn't work with Tattler lids. With regular two-piece metal lids, you pack your food, wipe the rim of the jar clean, place a hot, previously-simmered lid on the jar, and screw down the ring firmly tight. Then it goes into the canner.
Tattler lids are different in the way they seal and you need to be aware of this. I use them myself; they work wonderfully for years and years if you follow the directions on the box. You pack your food, wipe the rim of the jar clean, place a hot, previously-simmered lid and rubber on the jar, and screw the lid only fingertip tight. Now that's barely snug, but it's just enough to hold the lid on the jar during processing! Most folks mistakenly tighten the ring as with metal two-piece lids.
When you take the jars out of the canner, immediately tighten the rings all the way and set the jars on a dry folded towel to cool. This is like the old zinc lids with rubbers where the instructions say "complete the seal." If you follow these instructions, they'll seal correctly and you can reuse them over and over for decades!

Conclusion

Canning is simply a learned life skill. Like all homestead arts, the more you do, the better you'll get— and the more confident you'll get, too! I've had to deal with a lot of these common problems over the years in my own canning and with the canning my friends and BHM family have done. I'm hoping that by reading this article, you'll be able to solve some of your own mistakes and avoid making others. Happy canning!

Dec 20, 2014

How To Can Potatoes

IMG_5822

Canning Potatoes

  Canning potatoes is my favorite method of preserving them for the following  year. They taste amazing (much better than store bought canned potatoes), and they’re really convenient to heat and eat. 
You can use this method with homegrown or store-bought potatoes, it really doesn’t matter. I’m kinda spoiled by our garden potatoes though, so that’s definitely my preference. Nothing beats a freshly dug Yukon Gold. Mmmmmm…
We enjoy canned potatoes heated in a saucepan, seasoned with a little salt and pepper and tossed in butter. They’re also fantastic for making mashed potatoes, potato salad, and soups, since they’re already thoroughly cooked and require no additional prep work.
Canned potatoes will stay good for years, though I’ve found that over longer periods of storage the texture becomes unappetizing. We try to use up our canned potatoes before a year’s time. By then we already have another crop coming in and ready to harvest, so we never run out of potatoes.
The next time you find yourself with an abundance of these delicious tubers, try canning them!
Editors Note: If you’re counting on canning to help your family meet its food needs in a crisis, when electricity may not be available, and would like some ideas on Canning Without Electricity or Propane, check out my recent video on Off Grid Canning.

Here’s how to can potatoes the easy way…

Equipment:
  • Pressure canner
  • Wide mouth canning jars and 2-pc lids
  • Canning tools (wide mouth funnel, jar lifter, lid lifter/tongs)
  • Large slotted spoon
  • Ladle
Ingredients:
  • 2-3 lbs potatoes per quart
  • Canning salt
  • Water

Method:
IMG_5789
Prepare potatoes for canning by washing and peeling them first. New potatoes can be scrubbed with a stiff brush without peeling. Keep a large bowl of cold water nearby to submerge your peeled potatoes in as you work, to keep them from turning brown.
IMG_5791
Cube the potatoes, and add them to a large pot. Cover the potatoes with water and boil for 10 minutes.
how to can potatoes
Drain the potatoes. I use a large slotted spoon to scoop the potatoes out of the hot water since the pot I’m using is usually too heavy to lift and pour out.
Meanwhile, get a small pot of hot water simmering, and allow your canning lids to simmer (not boil) for 10 minutes. Keep them hot.
Also, fill a large pot with water and bring to a boil.
canning potatoes
Fill hot, sterilized jars with the hot potatoes, leaving 1″ headspace. (“Headspace” is the space between the food and the rim of the jar.)
how to can potatoes
Add 1 tsp. canning salt (or Kosher salt) to quart jars, if desired. This has nothing to do with preservation, it’s only for flavoring. If canning in pint jars, add 1/2 tsp salt. Don’t use table salt (iodized) or it might discolor your food.
IMG_5800
Ladle boiling water into jars, leaving 1″ headspace.
Use a plastic or wooden utensil (not metal) to poke around in the jars to remove air bubbles. Add more water as necessary to maintain 1″ headspace.
IMG_5802
Use a wet cloth to wipe the rims clean, being sure to remove any food or salt particles which would prevent the lid from sealing. (Remember, even the tiniest chip or crack in the rim of a jar can cause seal failure, so it’s important to check your rims before filling the jars.)
IMG_5804
Place hot, previously simmered lids on filled jars.
IMG_5805
Screw the ring down finger-tight. If using Tattler reusable lids you’ll want to follow their directions accordingly.
how to can potatoes
Place filled jars in the pressure canner. If you’re using an All American brand pressure canner, the rack should be in the bottom of the canner along with 2″ water (which will obviously rise as you load the canner with jars). Be sure to consult your canner’s instructions if you are unsure of how much water to use.
Important: You absolutely MUST use a pressure canner for canning potatoes (and any other low acid foods, ie: vegetables and meats). Canning potatoes in a water bath canner risks poisoning your family with botulism. Taking short cuts isn’t worth your life or the life of a loved one. Invest in a good pressure canner, and it’ll last for generations.
pressure canningPlace the lid on the canner, tighten it down, and turn the heat up to med-high. Once the canner begins to steam, allow it to vent for 10 min. Then place the regulator weight on the vent cap, and watch the pressure rise to 10 lbs. Start your time.
Process pints for 35 min., quarts for 40 min. at 10 lbs pressure. (If you live above 1000 ft. you’ll want to can at 15 lbs. pressure.)
Adjust your heat accordingly to maintain the correct pressure. I usually turn mine down to medium heat for the remainder of the session.
When the canning process is complete, turn the heat off and allow the canner’s pressure to drop back down to zero before removing the regulator weight and unscrewing the lid. Allow the jars to sit in the canner for an additional 10 minutes before removing, to reduce siphoning. Always be sure to take the lid off away from your face, as very hot steam will be escaping.
IMG_5807
Using a jar lifter tool, remove the jars from the canner and place them on a cooling rack or towel for 24 hours before testing the seals. To test the seals, remove the ring from the lid and pull up on the metal lid with your fingers. It should not come off. If it does, the lid has not sealed and you’ll need to put that jar in the fridge to be eaten in the next few days.

Storage

Store home canned goods in a cool place away from direct sunlight for best quality. It is best to consume home canned goods within a year for highest nutritional value, but they can be safely stored for many years- although taste, texture, and nutrients will diminish over time.
Potatoes are naturally starchy, so over time you will notice that the liquid in the jars will turn cloudy or even white. This is normal. Also, if any of the potatoes are poking up above the liquid in the jar, you may notice that they’ll turn brown over time. This is okay, but isn’t very appetizing. I usually discard those parts, just for appearances.
You’re going to love your home canned potatoes!

Nov 7, 2014

15 Canning Tips for Preppers | Self-sufficiency

canning tips, canning food, canned food, home canning tips

Canning is an essential skill for preparedness and survival. You can save money and store food that will last a long time. When faced with any SHTF scenario, you can rest assured that you will have plenty to eat as long as you plan ahead.
We have already covered the basics of canning and the two most common methods. The materials needed for canning has also been discussed in a previous post.
Learning how to can might be a learning curve, but if you have the determination to get involved in this self-sufficiency skill, you will get the hang of it in no time. All you need to do is consider the benefits of canning to realize that the time you put in is worth it.
Here are some tips to make canning easier, or that will let you take your skills to the next level.

1. Get a good canning book.

canning book, canning books, canning recipes, canning tips, canning guide, canning for survival
Prepare food for SHTF by reading these other top books on canning. Via Seemomclick.com.
Well-Preserved: Recipes and Techniques for Putting Up Small Batches of Seasonal Foods by Eugenia Bone is the book for gourmand canners who care more about stocking your pantry with variety than quantity and for urban canners who think it’s cool to have a larder in Soho.
Put ‘Em Up! A Comprehensive Home Preserving Guide for the Creative Cook by Sherri Brooks Vinton is an inspiring resource for new canners and for folks who like to have pretty pictures along with exceptionally interesting recipes.
The Big Book of Preserving the Harvest: 150 Recipes for Freezing, Canning, Drying, and Pickling Fruits and Vegetables by Carol W. Costenbader is for you if you’re looking for a comprehensive canning guide with straightforward, easy-to-understand instructions.
The Joy of Pickling: 250 Flavor-Packed Recipes for All Kinds of Produce from Garden or Market by Linda Ziedrich will delight anyone who loves exploring history and culinary traditions. Of course, pickle love is a must!
To read the full article click here.

2. From Start to Finish – Canning Should be Organized.

canning procedures, canning efficiency, survival canning, canned food
Every prepper knows that organizing materials is very important in canning. Via thegreenestdollar.com.
It’s important to stay focused during the canning process, to properly monitor the progress and not to forget an important step. Time is of the essence when it comes to canning. The object is to get the food processed as quickly as possible, from preparation to sealing, to reduce the risk of food deterioration which could affect the finished product. Keep your guidelines handy for quick reviewing and be prepared to stay the course and finish the process. See more.

3. Pectin is a Great Canning Ingredient.

pectin, canning, home canning, canning for preppers, pectin for canning
Pectin can save time in canning giving you opportunities to prepare other things. Via Simply Living Simply.
According to Allrecipes.com, pectin–an essential gelling agent–is found naturally in many fruits, such as apples, plums, and oranges. Most recipes call for added pectin, in either liquid or powdered form; there are also special pectins available for making low-sugar preserves. Jams and jellies made without pectin must be cooked longer, depending upon the amount of natural pectin in the fruit.
When making jams and jellies, make sure to use the proper ratio of sugar, acid, and pectin to achieve the right texture and flavor.

4. Botulism in Home Canned Food: Less Common Than You Think.

canning properly, canning hygiene, canning risks, health risks of home canned food
Preppers can avoid health risks by using the right food for the right packaging. Via containerandpackaging.com


Botulism is a serious foodborne illness, but it is also exceedingly rare. Like shark attacks and plane crashes, the fear of botulism generates exaggerated anxiety that is out of step with the actual risk. It may be calming to know that botulism is caused by improperly canned low-acid foods, such as fish, legumes, and vegetables. Acidity is the silver bullet against the bacteria that causes botulism, so high-acid foods—such as most fruit-based sweet preserves, vinegar pickles, and fermented vegetables—are safe from botulism risk. Berkeley jam guru June Taylor says the only way you could hurt a person with a jar of jam is if you hit him in the head with it.
Click here to learn more.

5. Let the Canner Make the Syrup.

canning jar, canning jars, canned food for preppers, food for SHTF
Canning without syrup is possible if a prepper knows what is needed. Via Foodstorageandsurvival.com.

When you’re canning fruit, most methods require that you mix up a light to heavy syrup to add to the jars of fruit prior to canning. This entails measuring sugar into water in a pot and heating it all up, hoping you didn’t make way too much or not enough, and dripping sugar-water everywhere while you’re filling your jars. Why not make your job less sticky and have the perfect amount of syrup for your peaches, pears, cherries, and more by letting the canner make the syrup?
Read more here.

6. Prep Tip: Check the pressure canner seals while you are getting it ready.

pressure canner, pressure canning for survival, preparing the canner, how to can at home
Preppers know how to avoid accidents and canning failure by checking everything. Via simplycanning.com.

mrswages.com: If your pressure canner has any gaskets or seals that are dried out or cracked, replace them. This will help your canner hold pressure while you are processing the foods. Also, the pressure saucepans are not meant to be canners and all recommendations are that you not use them as such.

7. A pressure canner can save water time and energy.

canner, pressure canning, pressure canning tips for preppers, canning food for survival
Preppers can save time and money by using the pressure canner more often. Via The Organic Prepper.

Use your pressure canner to can applesauce, apple pie filling and tomatoes, even though they can be water bath canned, using the pressure canner on 5lbs. of pressure greatly reduces time and energy when canning these foods. Plus, it saves on water used, a plus in droughts or preparedness times when water is scarce. Click here to see more money-saving tips on pressure canning.

8. Canning Chili, Stews or Soup? Go Easy On The Seasonings.

(For Canning Homemade Soups, Stews, and Chili)
Herbs and spices will strengthen over time, so go easy on them when canning. Especially spicy stuff. It is recommended that you avoid Sage altogether, as it turns bitter during canning. You might want to just add the seasonings to the dish as you’re re-heating it before serving.

9. Green Bean Canning Tip: Adding ingredients like ham or bacon to green beans is not safe.

canning green beans, green beans, canning jar, food for preppers, SHTF food
Can your green beans with care to avoid spoiling your SHTF food. Via Freshpreserving.com.
Can the green beans adding only Mrs. Wages Canning salt if you add anything. Green beans may be packed either raw or hot. Either way, pack the beans tightly into the jars and add salt as desired. Fill the jar to within 1-inch with boiling water and remove air bubbles. Wipe off the jar rims and process at 11 pounds in a dial gauge canner or 10 pounds in a weighted gauge canner 20 minutes for pints and 25 minutes for quarts. Read more.

10. Canning Newbies: Start with small batches.

canning newbies, tips for new canners, food for survival, self-sufficiency
Preppers who are new to canning should start small. Via uscrow.org.
According to takepart.com,
If you’re just getting started, work in small batches—just two or three pounds of fruit or vegetables at a time. A small batch is easier to manage, quicker to make, and more economical. And if the recipe doesn’t work (which is unlikely), there’s less heartbreak involved in a small failure. Besides, how much strawberry jam or corn relish can anyone use? You’re not stocking a bomb shelter.

11. Skip the pasta and rice when canning soups, stews and chili.

canning soup for survival, canning noodles, canning stews, canned noodles for preppers
Canning food is a great way for preppers to stock up on food for when SHTF. Via noregretsliving.wordpress.com.
For soups, stews and chili:
Or at least put in very little when making stuff like chicken noodle soup. Also, you don’t want to cook noodles or rice before processing them in the canner, or they’ll turn to mush. Instead, make your soup base, fill your jars, then add a tiny bit of raw noodles or rice, then proceed with canning. Better yet, just leave them out and add them to the soup as you re-heat it. The problem with adding too many noodles is that the soup can get very thick in the center of the jar, which won’t get heated adequately during the canning process. You risk food poisoning, even botulism, if you haven’t heated the contents of the jar well enough. If you absolutely have to add the pasta, go easy on it. More tips from the source.

12. Yes, the family can can!

canning with the family, canning with kids, family canning, preppers and canning, canning for fun and survival
Canning brings a prepper family together. Via safefood.peaksmaker.com.
Melissa K Norris says, Enlist the help of children and family, even small kids. Explain why you need help and how this food will help feed them throughout the winter months and money. It creates a family bond and sense of accomplishment with the children. We snap our beans together as a family and makes the workload less on me. Kids feel a sense of ownership when they help grow and prepare the food themselves and don’t fuss when it comes to eating their veggies.

13. Three F’s in Canning: Freeze Fish First.

If you want to can smoked salmon, freeze the fish first. Frozen fish accepts the brine better than fresh. See more.
Here’s a nicely and thoughtfully done video on canning fish from a fellow prepper.

14. Safety Tip: Don’t leave jars of food in the canner overnight.

canning safety, safe canning for preppers, canning safely, how to can safely
Canning is safe if you are prepared. Via ucanr.edu.
If you live at a higher altitude, charts for adjusting the pressure are available in canning books or from your local Extension Office.
Remember, the only SAFE way to process low-acid foods (which are all vegetables, meats, and vegetable mixtures) is by using a pressure canner. This is because of c. botulinum toxin, which is present in low acid foods. C. Botulinum is only destroyed at temperatures above 212°F. which can only be achieved in a pressure canner. Now I know some of you will say your oven reaches temperatures higher than this BUT the oven does not remove air from the jars, which is necessary to prevent botulism toxin from growing. Pressure does this.
Any way you look at it, you cannot safely can corn, green beans, or any other vegetable without a pressure canner. Period. Other methods are very risky and can result in botulism poisoning which attacks the central nervous system and can cause death. Read the full post.

15. More canning tips in this video


Here is the link to the YouTube video.

http://survivallife.com/2014/11/07/canning-tips-for-preppers/

Sep 2, 2014

Major Change in Canning Procedure!

There has been a major change in the procedure for canning in Mason jars. I’ve been pondering hard on why I’m having too many jars not seal when canning lately. I’m very careful with my process, so I’ve been very upset to have jars not seal. As it turns out, there was a change in process that wasn’t widely publicized.

 
I’ve always trusted my grandmother as the expert on all things canning. I’ve followed her recipes and advice to the letter. The same thing goes for my mom. These ladies have me on experience by decades. I’d be a fool not to listen. This new change has taken us all by surprise. I guess we learn to adapt and overcome!

This change involves the lids we use on our jars. For 100 years, the process has included simmering the lids in a saucepan of hot water on the stove. We do this to sterilize the lids, and until recently, to soften the rubber so the lid would seal. This is now WRONG! 100 years of tradition is gone now. If you simmer new lids, there is a decent chance they will not seal. I’ve experienced this a lot lately. I’ve had a ton of jars not seal while following the process I grew up with.

After all the failures, and researching online to get the new information, we’ve just been washing the lids with warm water and putting them on jars. We’ve processed a couple dozen jars this weekend and have had no seal failures. This is a big change, since we’ve had a lot of failures to seal this summer. I was really getting concerned about my abilities to can. I’m happy to report, it wasn’t anything I was doing wrong, just a change I wasn’t aware of.

I wish the lid manufacturers would have made a better attempt to inform us of the change, but at least I know now and can pass the information along. If you are having issues with lids not sealing, stop simmering. We have, and it has made all the difference.

It is rare that I post two articles in the same day, but I thought this was worth sharing immediately. If I can spare one of my readers the hassle I’ve been experiencing with canning and having failures, then I will feel a lot better.


http://survivingmodernlife.com/2014/09/major-change-in-canning-procedure/ 

Aug 10, 2014

Canning Butter and Cheese

Canning Butter and Cheese
By request from a reader, here are directions for canning butter. I've also included directions for canning cheese, after the section on butter. I appreciate the request.

Canning butter

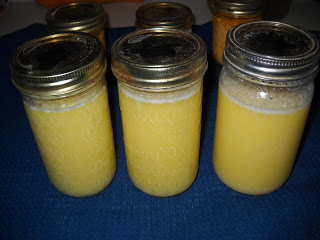
Home-canned butter
It's easy to can butter and cheese at home. It can be done in a water-bath kettle, or any kettle big enough to cover your jars with water. You need some kind of rack in the bottom to keep the jars slightly elevated, but I've used a cooling rack in the bottom of a kettle, or a rack from the bottom of a roaster pan. You can use a pressure canner, either with the lid latched and brought to pressure, or just with the lid settled on top.
 
Some people melt the butter first, in a pan, and let it simmer for a while before pouring it in jars. I set my jars in a pan that has a couple inches of water in it and the stove burner turned low. Then I slice chunks of butter into the jars. The heat of the water melts it and I keep adding butter. I fill the jars to about an inch from the top, to allow for 'head space', which is a space you leave between the product in the jar, and the lid.
 
I found this explanation of head space on a site called http://www.pickyourown.org:
"This space is needed for expansion of food as jars are processed, and for forming vacuums in cooled jars. The extent of expansion is determined by the air content in the food and by the processing temperature. Air expands greatly when heated to high temperatures; the higher the temperature, the greater the expansion. Foods expand less than air when heated. This is why you must leave more headspace when using a pressure canner!"
 
Although it says "when using a pressure canner", I think head space is also needed in water-bath canning, since the air is heated in the jars during that process too. At any rate, the extra space at the top would prevent boiling over.
 
While I'm letting the butter melt I get a small pan and put the jar lids in it and cover them with water. I let them simmer on another burner. What I've always been told is that it softens the rubber strip around the edge of the bottom side of the lid and allows it to seal to the jar. My mother always simmered hers for at least half an hour, so I have too. The one time I forgot to get them started and simmered them for just 15 minutes I had quite a few jars in that canner load that didn't seal. So science aside, I stick with the half hour minimum.
 
When the jars are filled I lift them out of the pan of water and set them on a towel. I go around and wipe the rims with a clean, damp cloth. Using a fork I fish a lid out of the small pan of water, and touching only the edge of the lid, I place it on the jar. Then I screw a ring on it until it's snug but not over-tight. This is a picture of the lids and rings, sometimes called caps and bands, or other terms.
I set the jars in my canning kettle, which usually already has hot water simmering in it. Sometimes I have to use the jar-lifter tongs to put the jars in the water, if the water is too hot. When all the jars are in I check to see that the water covers the tallest jar by at least an inch. If it doesn't, I add water.
 

Now the lid goes on and when it boils, I begin timing. I've seen directions that say they need to boil for half an hour, for 45 minutes, and for an hour. I went with the hour, for safety, but butter isn't a dense food once it's melted, so it's probably safe enough to boil it for the shorter time.

When the butter comes out it looks like this.

After it's cooled about 15 minutes you need to start picking up the jars, holding them in a hot pad or towel but making sure you can get a good hold on the jar, and tip them upside down and back upright a few times. The butter has separated during canning and this mixes it back up. Some people shake their jars but I prefer to tip them over and back upright instead. I suppose I imagine the butter getting bubbly and frothy-looking if I were to shake it!
 

Pick them up about 10 minutes, and more often if you think it needs it, until it's cool enough that it stops separating as it sits. When it's cool it'll look like this:

As you see in the picture at the top of this post, I use different sizes of jars for butter, but I tend to stick to small jars, such as half-pints and jelly jars. I have canned butter in jars as big as pints, though.

* * * *

Canning Cheese


In addition to butter I also can cheese. The thing I like about canning cheeses is that they return to their original texture and firmness after they cool. For example, canned cheddar firms back up and can be slid out of the jar and sliced:

or shredded:

I use jars that have the same size mouth, or opening, as the sides of the jar. In this picture the cheese was in a half-pint jar. It uses a regular-mouth lid, but since the jar is so small it looks like a wide-mouth jar, with straight sides. If I use a pint jar I use a wide-mouth one. It's easier to get the cheese out of the jar.
 

To remove the cheese from the jar I hold it in a pan or bowl of hot water for a couple minutes. This softens the cheese where it touches the glass. Remove the lid and run a knife around the inside of the jar. Keeping the knife between the cheese and the side of the jar, apply a litttle pressure to the cheese and slide it out with the knife.
 

When you're done cutting, slicing, or shredding it, push the leftover block of cheese back into the jar. It's easier to slide it out when you go to use the rest of it later.
 

Mozzarella cheese cans up nicely. It turns a darker color and is a bit more crumbly as you shred it, but once the pizza or lasagne, or whatever you've made, is done baking, you can't tell the difference.
 

Cream cheese is one of my favorite cheeses to can. This time of year (November) cream cheese is on sale for a good price at our local store, so I buy several boxes and can them. Later in the year when cream cheese is twice the price I paid for them, I still have lots of cream cheese.

 
Cream cheese looks pretty after it's canned. It doesn't darken during canning like other soft, light-colored cheeses. The texture is the same as a fresh block of cream cheese.
 

I can cheese the same way I do butter. I set the jars in a couple inches of water, in a pan on the stove over low heat. It takes longer for it to melt. One time I crammed the jar full of chunks and canned it without waiting for it to soften or melt, figuring it would melt during canning. I ended up with jars about 2/3 full. I also didn't know if I'd allowed enough time for the cheese to melt and then get hot enough for canning.
 

Cheese is denser than butter, so it really does need more time than butter. I can mine at a full boil for an hour. Pressure canning is a good option for dense cheese like cheddar and mozzarella. I haven't tried cheese like pepper jack and provolone, but I plan to do that some time this winter. I'm watching for a sale.
 

Cheese doesn't separate like butter, so once you remove it from the canner you don't have to do anything to them. Place them on a towel and let them cool.


Other dairy products I've canned have had varying results. Egg nog cans up nicely but darkens a little and separates somewhat. It needs to be shaken before you drink it. We can up a jar or two at Christmas time, then in the summer we open them for a surprise treat. The first year we didn't chill the jar first, and egg nog tastes icky at July room temerature! Be sure to chill it first!
 

Milk can be canned but you end up with a product that looks like evaporated milk. The flavor tastes slightly scorched but is otherwise good. It, also, tastes better if you chill it before drinking.
 

If you're a margarine user I would imagine it could be canned the same as butter. Not knowing how the scientific properties work in the 'healthier' mixes of margarine I'd recommend using only real margarine. If you're using a heart-healthy variety that says it can be used in baking or melted in cooking, then it would probably do okay for canning. If you find a really good sale on it, canning might be a money-saving option.
 

I go one better on my canning. I don't have extra energy costs for canning butter and cheese. I almost always can it this time of year when it's on sale for the holidays, and here in Montana we're using our woodstove all day to heat our cabin. Our woodstove has a large flat surface big enough to hold two canner kettles, side by side. I take advantage of the heat source that would be hot this time of year anyway. For those of you that heat with wood, you might be able to do that too.