Showing posts with label gardening. Show all posts

Sep 6, 2015

How Long Will Your Food Last After SHTF?

HungryChild

One of the central pillars of preparedness is being able to feed yourself. Preppers focus some of their attention on stockpiling food as well as creating renewable sources like gardens or livestock (chickens and rabbits) as protection against the possibility that the local grocery store is no longer able to provide something to eat. The average person it has been said only has about 3 days’ worth of food in their homes and if that is true, feeding your family in certain disasters could prove to be possibly your biggest problem.
We have already seen time and time again, scenes of grocery store shelves stripped clean anytime there is a concern in the public. Greece was just the most recent example of this behavior preppers warn against. Starvation would surely be a horrible way to die and it seems as though collectively we all consider this a threat that must be dealt with to ensure the safety of our loved ones. The question is how you will deal with the risk of not being able to feed your family. Will you stock up on food nowwhile you are able, or will you try to swim through the crowd of potentially thousands of other people raiding the local grocery store in the hopes that you can secure enough food to last your family though whatever disaster you are facing?
Continue Reading...

Aug 9, 2015

7 Ways To Use Amazing Baking Soda In The Garden

7-baking-soda-uses-garden
Baking soda is a vital part of green cleaning and has so many uses in the house, but what about the garden. Here are 7 ways to use it in the garden.
Continue Reading...

Aug 2, 2015

How To Use Epsom Salt For Sweeter Tastier Tomatoes

epsom-salt-sweeter-tastier-tomatoes-07302015

What is Epsom Salt?

First of all, Epsom salt is not salt. NOT something you can put on your food!
It’s actually a compound called magnesium sulfate that occurs naturally. The name Epsom is a nod to a saline spring found in a part of England by the same name.
Magnesium sulfate is known for providing wonderful benefits for tomatoes functioning as a plant fertilizer.

How To Incorporate Epsom Salts In Growing Tomatoes

Continue Reading...

Jul 14, 2015

Super Low Maintenance Food Garden


Whenever I talk to people about gardening, invariably I will hear someone say “I would love to garden but I just don’t have the time.” I usually launch into my schpeel about how it is pretty much only the beginning and end of the growing season that is the busiest and, if done right, takes very little time during the peak of the season. Regardless of your skill level or area to work with, it is 100% possible to have a super low maintenance food garden.
Super Low Maintenance Food Garden
Of course, it depends on what you want to grow in your garden. Tomatoes, for example, are more of a high maintenance food to grow. The bottom line is if you really wanted to garden, you would figure out a way. Just like life always manages to find a way (think dandelions in sidewalk cracks), you can garden no matter what your schedule is or what space you have.
Through my own experiences, I have learned and grown several plants that require very low maintenance and will give you great returns on your investment. Keep in mind that if you are gone traveling often, you may need a garden plan that is suited and customized to you. This will be a very general list of some basic, easily identifiable foods. All of them can be planted in containers or in raised beds, depending on what you have to work with.

Vegetables

Whether you want to garden to help ease the food bill over winter or just to have some fresh food readily available, there are numerous vegetables that can be grown incontainers and even on a tight budget! If all you have to work with is a tiny apartment ‘balcony,’ you can still do this! The list below gives you an idea of things that are very easy to plant and then just water as needed until it is time to harvest. Getting sprouts from a local farmer or nursery is a way to vastly increase your chances (and cut down time needed) of success for your new low maintenance food garden.
  • Salad greens
  • Kale
  • Garlic
  • Carrots
  • Onions
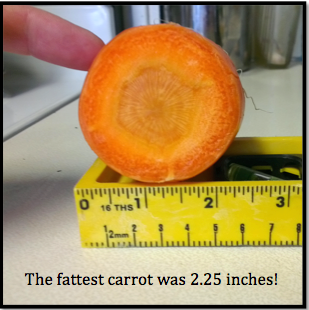
Fattest Carrot 2014If you are growing root vegetables, make sure your containers or raised beds will be deep enough. If that is not possible, there are usually some varieties of veggies that aren’t so deep such asDanver Half Long carrots. I have personally grown that variety for three years now and while they don’t get long, the carrots are FAT! If you end up with a lot of extra, you can always quickly pickle them up and won’t need any special equipment to do it. Don’t know how to pickle? It is incredibly easy and you can learn in a single afternoon!
The list above is a short peek at numerous items that are very easy to plant and forget about (other than watering). You will need to check on things every few days but once you get into the habit, a simply glance can tell you all you need to know about the state of the garden. You aren’t limited to just veggies though!

Herbs

  • Sage
  • Basil
  • Oregano
  • Rosemary
I take pleasure in growing and drying my own herbs and spices. The price of them up here in Alaska at the store is almost exorbitant, especially if you want fresh! I tend to grow my herbs in larger sized pots and they produce enough that, when dried, will get me through the heavier cooking season (holidays) and into the next year. I use a lot of sage and got sick of paying $6 for a 4 ounce bottle. I instead spent $2 on a start and that will grow so much I end up giving some away! That is a serious return on investment and all I have to do is transplant the sprout into a new pot with good soil. Water and leave it be until it is nice and full. I dry my herbs up and use the store bought bottle over and over again. I used to notch the lid to keep track of how often I have filled it but once I passed the 10th notch, I knew I was saving copious amounts of money on my spices overall (I really do use A LOT of spices).

Berries


Wild berry locations are wonderful and I highly encourage you to seek them out and get to picking! If you are in a food desert, you can still grow strawberries in containers such as using a PVC pipe to grow vertically in. It will save space, watering is a breeze, and at the end you get strawberries that you grew! Imagine waking up in the morning and picking fresh strawberries off your plant to be sliced up and added to your yogurt, oatmeal, or cereal.
Overall, strawberries would likely be the lowest maintenance berry to grow though the lingonberries can also be grown in a container that would result in modest returns. Still, it is possible. Other berry bushes would be too much maintenance and work in containers than if they were just planted in the ground or a raised bed. You have to decide what is right for your own situation and what you want to accomplish.

Lowering Maintenance

Weeding and dealing with pests can take a lot of time. Thankfully, there are several methods of keeping those pesky plants and bugs at bay without using chemicals.

Jul 3, 2015

13 Tips For Building The Best Raised Beds


Raised bedsThere are many reasons why raised bed gardening is becoming so popular. One of the main reasons that they’re great for people who don’t have a lot of room is because you can put more plants in a raised bed than you could in a garden, thus making the most of what space you have.
The boxes are filled with dirt and compost that you control, so you can feed your plants exactly what they need to grow and flourish instead of depending on local soil. Raised beds maximize water usage so you grow more even in drought conditions and if you live in a wet climate, excess water can drain better. Soil erosion or compaction aren’t issues, either.
Since raised beds warm faster than the ground, your growing period is longer than if you had a traditional garden.Because the conditions are so controlled, raised bed gardens are much more forgiving for beginning gardeners and are easily tended by those with more experience. Snails and other pests have a tougher time reaching raised beds, too.
Finally, let’s not forget the strain that it takes off of your body. Raised beds won’t require as much bending because they’re built higher and, since they repel weeds, you won’t have to spend time bent over tending your garden.
But where should you start if this is your first time? Should you avoid any practices and are there tricks that can increase your odds of success? That’s what we’re going to discuss today!
Are planters and raised gardens the same?
This is a question that we hear a lot and seems to cause serious confusion among first-time raised-bed gardeners. The answer is a resounding “no”. The primary, and significant, difference between raised bed gardens and planters is that planters have built-in bottoms and raised bed gardens don’t.
This is a significant difference because the lack of a bottom allows the roots of the plant to grow as deeply as they need to in order to anchor the plant and obtain the nutrients that it needs for survival. Imagine trying to grow a carrot in a planter – you wouldn’t have much success, right?
What types of wood should you build raised bed gardens?
Without a doubt, wood is the most commonly used material in the construction of raised beds but you need to be careful. Don’t use wood that’s been treated with toxins such as railroad ties that have been soaked in creosote. You don’t want that to come into contact with your food.
Although the EPA says that the chemicals used to pressure treat lumber (alkaline copper quaternary, aka ACQ and copper azole, aka CA-B) is safe to use for growing food, as recently as 2003, a toxic chemical called chromated capper arsenate (CCA) was used so if you’re using reclaimed wood that is that old, you may be unintentionally mixing arsenic into our soil.
I personally avoid pressure treated lumber in my raised beds because it’s a chemical and I wouldn’t drink it. In my mind, that means that I shouldn’t grow my food in it. According to sources that I found, treated lumber isn’t permitted to be used in commercial organic gardens or else the food isn’t considered organic. I guess it’s fine to use for ornamentals, though. It’s a personal decision so make your own call.
There’s also a concern about using recycled pallets, not because of the chemicals that they’re treated with but because you don’t know what they’ve been in contact with. Remember, pallets are used to hold everything from cases of rat poison to boxes of raw chicken and they have been shown in a lab setting to harbor everything from bird poop to E. coli. You may want to skip pallets if you’re growing food.
If you want to play it safe, use untreated lumber. Woods less prone to rot are great because you’ll get longer life from your beds but they can be costly, too. Redwood, cedar and Jupiter are all woods that are rot-resistant if you’re interested in going that way.
Is concrete safe to use to build your raised beds?
This is a question that’s been cropping up more often since people started making those extremely efficient beds out of concrete blocks, aka cinder blocks. The argument here is that concrete contains chemicals and cinder block is often made from fly ash, which you wouldn’t want around your food.
The truth of the matter is that, though concrete dust is hard on your lungs and there are chemicals used in the production of some concrete, the actual ingredients of standard concrete are benign. Though “cinder block” is used in most parts of the country as a synonym for a concrete block, they aren’t actually made from cinders any more.
I couldn’t find any solid evidence from a single credible source that says that concrete is harmful if it comes into contact with your food plants so I’ll continue to use it.
If you make the same decision, be careful about adding chunks to your soil because concrete is alkaline and you may unintentionally affect the pH of your soil. I don’t think this is much of a concern if you’re using concrete block as your structure though.
Using other materials
Modern technology has blessed us with plastic and composite materials that we can use to make fake boards. HDPE (High density polyethylene) is the plastic that’s usually used to make these and it’s a non-leaching material most often made from recycled milk jugs.  It’s a lot more durable than wood.
Though I’m typically against using store-bought anything, especially plastic, if I can avoid it, I’d possibly consider using these because they actually support recycling.
Other materials that are good to use include logs and stacked sand bags. Really,you can use whatever you want; they ‘re your beds. Just watch out for materials that may leach toxins into your soil.
How tall should your raised garden beds be?
This is a question with about a thousand answers but they’re all a variant of “however tall you want them or need them to be.” Obviously taller beds are going to require more dirt and compost. The only reasons that you would want to go much higher than 12 inches, which is the average height of a raised bed, is if the soil underneath your bed is bad and you don’t want to dig or if you want them to be taller so that you don’t have to bend as much.
Keep in mind that if you go taller than 18 inches  or longer than 6 feet, you should probably reinforce the sides of the bed with braces so that the wood doesn’t bow out and distort the shape of the box or let your dirt escape. Use cross supports ever 4-6 feet to prevent this from happening.
raised beds garden
Remove roots from the soil when digging your raised bed
You want to prepare the soil underneath your raised bed garden carefully before you build your bed over it. Remove any roots that you find because they’ll leach the nutrients out of the soil before your plants have a chance to get to them.
You’ll want to dig down about 16 inches and turn the soil well, removing any rocks as well as roots while you go. Layer the soil up the sides so that you have a trench to put the soil in.
Level the soil under the bed first
This may sound silly because you’re just going to pour your own dirt and compost in there, right? Well yes, but the soil is going to settle a bit after a few waterings and you want them to do so on the level so that your bed settles level instead of listing one direction or another.
Use a level for this because you’d be surprised by the difference that just a couple of inches make. You may want to add your soil, water it, then let it settle for a few days before planting anything in it just to be sure you’re good.
Build the long side of the bed facing south
No, we’re not just doing this to give your beds a room with a view. Well, yes we are, sort of. If you put the long side of the bed facing south, your plants will be getting even exposure to sunlight which will help them to grow efficiently and equally.
Account for moles and other burrowing pests
If you live in an area that has a healthy mole population, you may want to consider lining the bottom and sides of your bed with hardware cloth, which is a metal mesh. If you’re planning on growing root crops, just dig a little deeper so that they have room to grow.
Don’t walk on your beds
One of the best benefits of a raised bed garden is that the soil doesn’t become compacted. If you walk on it, you’re compacting the soil which will inhibit root growth because you’ve decreased aeration in the soil. Nothing with any weight should ever enter your raised bed garden, including pets and even buckets with anything heavy in them.
It may be helpful to build a spanner board along the edge of your bed to kneel on or to set you buckets on. This is just a board that runs the length of the bed but is laid flat across the top of the bed so that it acts as a shelf.
Be careful using mulch between your beds
raised beds garlicThe only reason I mention this at all is because I hate weeds and have learned that sometimes mulch contains weed seeds. The reason that I typically use mulch is so that I don’t have to weed between my beds but if the mulch comes pre-seeded, that kind of defeats the purpose.
Ask the dealer if they know anything about this or have received any complaints if it matters to you. It really isn’t a big deal but I thought it was worth mentioning.
What is a root barrier and do you need one?
First, let’s explain why roots are bad. The roots of trees and shrubs are attracted to the moisture and nutrients in your raised beds and will grow to them, sucking the nutrients out of the soil before your plants can get them. Now, what’s a root barrier and do you need one?
A root barrier is built between the trees and your raised bed gardens by digging a trench 4-6 feet deep and lining it with roofing metal or the like so that the roots can’t reach your beds. If you’re building serious beds that you plan to use for a long time, then you may want to do this.
If it’s just a hobby, you don’t need to unless you just want to. Try to put your beds far enough away from trees or shrubs that this won’t be an issue.
What are some standard measurements?
These are your beds so you can build them however you want but you need to make sure that you can reach the center of the bed without walking on the soil and you need to make sure that your spot has the right amount of sunshine.
Standard raised beds are 4-6 feet wide by 8-12 feet long. You need to allow plenty of room to put that rich, nutritious soil in, so make the sides at least 12 inches tall and break up the soil at the bottom at least 6 inches down, and preferably 12-16 inches down, before you add the dirt so that you get proper aeration and can remove rocks and roots.
Trellises are awesome
If you’re planting vining plants such as tomatoes, save space and veggie rot by adding some trellises into your raised beds. Trellises can be as simple as using wooden stakes or actual pieces of trellis buried into the soil. As the plant grows, feed them up the trellis, tying them loosely as they grow. This will increase your yield and also make it easier to trim the sucker leaves off of your plants.
Raised bed gardens are as unique as the person who builds them. They’re awesome for both experienced gardeners and newbies alike and are a great way to grow your own food in limited spaces. You’ll probably make a few mistakes and have some growing pains as you learn, but that’s all part of becoming really good at it.
If you’re worried about survival, you’ll already be ahead of the pack if you have a garden started, even if it’s just a little one. Regardless of why you want to build your own raised bed garden, eating a fresh tomato from your own garden will be well worth the effort!

Jun 29, 2015

Gardening Link Bomb

GardenVeg

I’ve always been astonished at how people can continue to live in a fog when so many signs point that we are in bad shape. [Enter the possibilities of some disaster here.]  But the more time I spend in “Preparedness” and drop hints or ask people probing questions, the more I notice that people are waking up.
One area that I see a lot of interest in is gardening.  For a ton of reasons, people are investing time, energy and money into growing their own food, or at least a portion to supplement what they purchase at the store.  There are many reasons for this trend, but the fact remains that people are getting their hands dirty.
In a recent poll on Prepper Website, I asked, “What is your gardening experience?”  At the time of this writing, 43% of those that responded either chose that they have “been gardening 1-5 years” or “I’m just starting out, but I’m on board!”  Another 10% said that they had 5-10 years of experience.  I don’t know about you, but my gardening success isn’t what I would like it to be.  I have eaten the fruit of my labor and everything, but I’m not happy with all the results.
In an effort to help my fellow gardeners out there, I have put together this Gardening Link Bomb of articles that will cover a multitude of gardening advice and know-how.  Good luck and Happy Gardening!

Methods
Soil
Seeds & Seedlings
Seed Saving from Biennials Takes Pre-Planning
Pollination
Fertilizer
Composting
Irrigation – Watering
Weed Killer – Insecticides (Organic)
Misc.
Grocery Store Gardening – Frugal amendments from the grocery store
Conclusion
If you know of a link to an article that should be on this list, or a helpful website, please send it to  me or you can include it in the comments below.  As always, if you have a tip yourself, please include it too!
Peace,
Todd

Jun 24, 2015

What Some Vegetables Can Contribute To The Year’s Food Supply

garden-for-victory
I derived the following information from a mid-1940’s ‘Victory Garden’ handbook, many of which were published during the time period of WWII by the United States Department of Agriculture for the benefit of Americans, most of whom were short on food and supplies because of the war. Americans were strongly encouraged to grow their own ‘Victory Garden’ to supplement their food supply.
As a nation we have always taken food pretty much for granted. Not the farmers, of course. Food is the stuff life is made of, to a farmer. But the rest of us haven’t always understood that. We have always had the idea in mind that there will always be plenty of food, if we just have the money to buy it. One might say that a nation is no stronger than its food supply.
Here is a recommendation given to Americans during that time regarding what (which and how) vegetables can contribute to one’s annual food supply:
(It might be useful preparedness information)


VEGETABLES

Make four servings each day.


1. Leafy, Green, and Yellow Vegetables.

Serve one from this group each day. Eat 3½ pounds per week per person (½ pound per day, 182 pounds per year) fresh or its equivalent in canned, dried, stored, or frozen vegetables. Can 25 quarts. Store 45 pounds.
Beans, Snap (50 lbs. Yield /100 ft. Row) (1½-2 lbs. to can 1 qt.)
Beans, Lima (50 lbs. Yield /100 ft. Row) (3-4 qts. in pod)
Beet Greens (25 lbs. Yield /100 ft. Row) (2-3 lbs. to can 1 qt.)
Broccoli (50 lbs. Yield /100 ft. Row) (Freeze)
Chard (100 lbs. Yield /100 ft. Row) (2-3 lbs. to can 1 qt.)
Collards (50 lbs. Yield /100 ft. Row) (Dry, Freeze)
Kale (75 lbs. Yield /100 ft. Row) (Dry, Freeze)
Lettuce (50 lbs. Yield /100 ft. Row) (Fresh)
Spinach (50 lbs. Yield /100 ft. Row) (2-3 lbs. to can 1 qt.)
Turnip Greens (50 lbs. Yield /100 ft. Row) (Dry, Freeze)
Peas (40 lbs. Yield /100 ft. Row) (2 lbs. to can 1 qt.)
Carrots (100 lbs. Yield /100 ft. Row) (2½ lbs. to can 1 qt.)
Squash, Yellow flesh (100 fruits Yield /100 ft. Row) (4 lbs. in shell)

2. Tomatoes, Cabbage.

Serve one of these each day. Eat 2 pounds per week per person (~¼ pound per day, 104 pounds per year). Can 25 quarts tomatoes or juice. Store or kraut 25 pounds of cabbage.
Tomatoes (200 lbs. Yield /100 ft. Row) (3 lbs. to can 1 qt.)
Cabbage (raw) or Kraut (100-175 lbs. Yield /100 ft. Row) (Store or kraut)

3. Other Vegetables.

Serve one from this group each day. Eat 3 pounds per week per person (~½ pound per day, 156 pounds per year). Can or freeze 15 quarts. Store 40 pounds.
Corn (100 ears Yield /100 ft. Row) (10-12 small or 5-6 large to can 1 qt.)
Beets (100 lbs. Yield /100 ft. Row) (2½-3 lbs. to can 1 qt.)
Onions (50-100 lbs. Yield /100 ft. Row) (Store)
Parsnips (100 lbs. Yield /100 ft. Row) (Store)
Turnips (100 lbs. Yield /100 ft. Row) (Store)
Chinese Cabbage (80 heads /100 ft. Row) (Store)

4. White Potatoes and Sweet Potatoes.

Serve one of these each day. Eat 3½ pounds per week per person (½ pound per day, 182 pounds per year). Store 140 pounds.
White or Sweet Potatoes (200 lbs. Yield /100 ft. Row)

5. Dried Peas, Beans, Lima Beans, Soybeans.

Serve one from this group three times a week. Eat 6 ounces per person per week (20 pounds per year). Store 14 pounds.


Adapted from Victory Garden Leader’s Handbook, US Department of Agriculture, mid 1940’s

http://modernsurvivalblog.com/survival-garden/what-some-vegetables-can-contribute-to-the-years-food-supply/