Have you ever been in a situation where you needed to do something but you did not have the right tool or gizmo to get the job done? In my “before-prepping” days that happened to me a lot but now? Not so much. I carry a Swiss Army Knife, a Gerber Shard tool and paracord with me all of the time and on most days, I also have my Kershaw knife. With these few items, I feel ready to face the world!
On the other hand, sometimes I need more than my little set of EDC tools and have to give a shout out to the Survival Husband to help me out. Something he keeps telling me is that I need a portable chain saw and I am beginning to think he is right. After all, carrying a hack saw in my handbag or day pack would be a bit much. Not only that, because it is made from scraps, it is literally free.
As luck would have it, today Above Average Joe is sharing his secret for making a DIY wire saw from bits and pieces of scrap items around the house. There is not much to making it and it weighs next to nothing – perfect to tuck away in a pocket or in your pack.
Follow along and see how easy it is to make an improvised wire saw from scraps.
Making The Cut: How To Make An Improvised Wire Saw From Scraps
When you need to cut something down to size, using your pocket knife is not always the best option.While a pocket knife can be used to cut small limbs and other items, doing so will quickly dull the blade and make it useless for other purposes, like skinning.
One of the most simple ways to cut up branches, limbs, and even PVC pipes when a power saw or hack saw are not available is by using a wire saw.These wire saws are widely available and most of them are inexpensive and should be a part of just about any bug out bag or camping kit.You can buy these nifty tools but it’s also extremely easy to make one yourself out of every day household items.There are two extremely simple methods in making DIY wire saw and which one you use depends entirely on what type of wire you have:Supplies:
- Stiff Wire: Electrical fencing wire, a stripped electrical cord from a wall outlet, metal coat hangers, or chicken wire (not as durable)
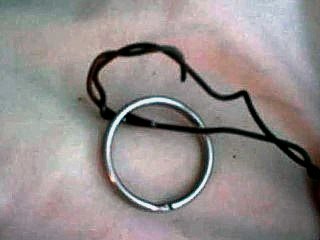
- Two key rings
- A pair of needle nosed pliers
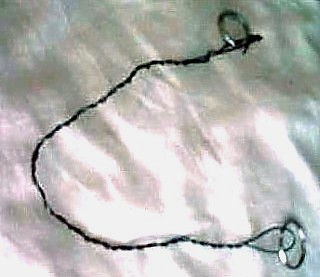
Step 1:Make the wire a little over 2 feet long.Put the key ring about halfway down the wire and fold the wire in half.Now start twisting the folded wire.Step 2:Once you have twisted the wire about to where you only have about 3 inches from the end you will need to create a loop to hold the second key ring.You will want to take the other key ring and attach it to the saw by twisting the wire through and around itself.The end result should look a bit like this:The second method is used when you have a thinner and more flexible wire like picture wire.You use the exact same method but instead of twisting, you use a simple reverse wrap like you would when making primitive cordage. See the video below:

Note: If you are having trouble viewing the video, you can see it by accessing this link:http://youtu.be/TpAQihS2at8.
Using this reverse wrap method will increase the tensile strength of the wire exponentially and even if you don’t use reverse wrapping for this. It is still a vital skill to learn.* As a note: When using this tool, make sure to be cautious.This tool can help you in a pinch but it is still improvised and is nowhere near as strong as a store bought wire saw.Start out using it in 30 second intervals with a 15 second break in between. If the saw seems like it is holding up you can begin increasing the cutting time.This will help to keep the wire from overheating and breaking.This tool will not make short work of that old hickory stump in your back yard, but it can help to cut limbs and small logs to a more manageable size.Survival is all about your ability to roll with the punches!About ‘Above Average’ Joe: I am just an average guy with a passion for learning. I am excited to share the things I learn with you but I am most interested in learning from you. Thank you, Gaye, for inviting me to share the Survival Life with your readers!
THE FINAL WORD
I told you this was easy. And it is essentially free. I would suggest that if you have them, try using some old guitar strings since they are particularly strong. One word of caution: leave your improvised wire cutter at home while traveling. I do not think that TSA would take too kindly to having this type of tool in your pocket or carryon bag.
BTW, this, plus my Swiss Army knife, gets me where I need to go!
No comments:
Post a Comment
Note: Only a member of this blog may post a comment.