Showing posts with label cast iron cookware. Show all posts

Jun 13, 2015

Nine Dutch Oven Cookbooks for Free

Welcome Preppers and Survivalists,


photograph by
Virginia State Parks’ Staff

Dutch Oven Cooking
What can I say, but Fruit-Topped Dutch Oven Cake

Link:
Scouting Magazine - A Beginner’s Guide to Dutch Oven Cooking
http://scoutingmagazine.org/2015/05/dutch-treats-dutch-oven-101/


Scouts
Once you get past all the unjustified political crap, surrounding the Scouting programs, they are a good organization for girls and boys.

Plus, they share their information with everyone!

Link:
MacScouter - The Dutch Oven Cookbook: version 2.3
http://www.macscouter.com/cooking/docs/DOCookbk.pdf

U.S. Scouts - Dutch Oven Cooking
http://www.usscouts.org/cooking/dutch_lh.pdf

Boy Scout Troop 412 and Cub Scout Pack 412 - Scout Dutch Oven Cookbook
http://www.zion412.org/Library/DutchOvenCookbooks/Scout%20Dutch%20Oven%20Cookbook.pdf

Scouting in Canada - A Scout’s Guide to Dutch Oven Cooking
http://www.scoutscan.com/pdf/dutchbeg.pdf


Not the Only Ones
So do a lot of other people, too

Link:
West Virginia Department of Agriculture - Cast Iron Cookbook: Yesterday and Today, volume one
http://www.wvagriculture.org/images/Literature/Cast-IronCookbook-1.pdf

West Virginia Department of Agriculture - Cast Iron Cookbook: Yesterday and Today, volume two
http://www.wvagriculture.org/images/Literature/Cast-IronCookbook-2.pdf

Idaho State University - Dutch Oven Cookbook
http://www.isu.edu/outdoor/pdf/2012_cookbook.pdf

Camp Chief - Dutch Oven Cooking Guide
http://www.campchef.com/media/manuals/CastIronRecipeBook.pdf

May 28, 2015

A beginner’s guide to Dutch oven cooking

A campsite primer for cast-iron cooking.
DutchOven
Welcome to the world of Dutch oven cooking. Whether you’ve cooked with one for years or just want to try it for the first time, we’ve designed this guide with you in mind. You’ll need a Dutch oven and an appreciation for good food.
We call lots of pots Dutch ovens. They’re the ones with three legs on the bottom, designed to sit above some coals, and have a lid with a rim around the outside edge to keep the coals on top from falling off. They’re made with two kinds of material: aluminum or cast iron.
Purists prefer cast-iron ovens. They’re heavy and rust if not properly cared for. But they conduct heat more evenly, and, if well seasoned, develop a nonstick surface that rivals Teflon.
Other folks swear by aluminum. They’re lighter, don’t rust and require fewer coals. But they can develop hot spots and lose heat faster. And food tends to stick.
CookingDutchOvenWhich Oven Is Right?The key to choosing a Dutch oven isn’t the brand or style. It’s whether the lid fits properly. Don’t use one that wobbles or is warped. Check the sides of the oven to make sure they’re the same thickness all around; uneven walls will result in uneven cooking. Note the surface inside. Is it rough or pock marked? If so, find one that’s smooth.
Dutch ovens come in a variety of sizes. Look on the lid for a number that indicates its diameter in inches. A 12-inch oven represents a standard size.
These days, most ovens come “pre-seasoned,” meaning the manufacturer has baked onto it a “patina” or nonstick surface. You’ll recognize the patina as that rich, black color that reminds you of Grandma’s skillet. But if you find an “unseasoned” oven, or one that’s rusty, don’t fret. Here’s a seasoning method that works well:
How to Season Your Dutch Oven1.Wash the pot and lid in warm, soapy water — this is the only time you’ll use soap in your oven.
2. Rinse well and dry with a paper towel.
3. Thoroughly rub the pot and lid with a thin layer of shortening, lard, olive oil or cast-iron conditioner. Do not use butter or margarine.
4. Set your outdoor-barbecue grill to medium/high heat (about 400 degrees) and separately place the oven and lid upside down on the wire rack. Close the cover and let the oven bake for an hour. Turn off the grill and allow it and the oven to cool down. You may repeat this entire process if you want a darker patina.
Note: If you’re careful, you also can use your kitchen oven for the seasoning process. But you might set off your fire alarm. Place aluminum foil or a cookie sheet on the bottom rack to catch any drips. Bake the Dutch oven at 400 degrees for one hour. Turn off the heat and allow the Dutch oven to cool down as your kitchen oven cools.
The Essentials:
  • Dutch oven
  • Charcoal briquettes
  • Lid lifter
  • Charcoal chimney (a me­tal tube with a handle). Fill chimney with charcoal briquettes. Place a wad of newspaper in the bottom of the chimney and light it, which starts the coals. You can also place the chimney on an outdoor gas stove for faster results.
  • Matches or barbecue lighter
  • Long tongs for handling hot briquettes
  • Heavy leather gloves; welding gloves work great
  • Cooking supplies and eating utensils
  • Paper towels, scrapers and nylon scrub pads for cleaning
  • Recipes and ingredients
Cooking Made EasyYou can cook anything in a Dutch oven that you can cook in your kitchen oven at home. To avoid serving “burnt offerings,” though, follow the simple “Rule of Three.”
Take the diameter of the oven (12 inches, for example) and subtract three (12 – 3 = 9) for the number of coals to place below the oven and add three (12 + 3 = 15) for the number of coals to place on the lid. This creates a temperature of about 325 degrees.
To increase the temperature by 25 degrees, place one coal on top of the oven and one below it (see the accompanying chart). But weather will have an effect. If it’s hot, the oven will cook faster; if it’s cold, it will cook slower. Wind also dramatically affects the results of Dutch oven cooking.
Also influencing the result: the way you position the charcoal briquettes.
Make a ring of coals about the diameter of the oven’s bottom, placing one coal in the center. Set the oven on top of the coals and evenly place coals around the outside edge of the lid, with two coals in the center and one on each side of the handle. Some Dutch oven cooks disagree about placing coals in the center. I prefer it. Experiment and see what works best for you.
Hint: If you can smell your food cooking, you’d better check it regardless of the time suggested by the recipe. It’s probably done.
Watch out when you lift the lid to check your food. I’ve seen many a dish spiced with “camp pepper” (ash) when folks try to lift the lid with a claw hammer, pliers, or some kind of fancy lever. The best lid lifter ever invented is the Mair Dutch Oven Lifter. It gives you control of the lid like it was your bare hand.
DutchOvenMealMake Cleanup a SnapWipe out the oven with a paper towel. For stubborn foods, use hot water and a nylon “scrubbie” or similar scrub pad (not steel wool) to remove all food from the pot. Or try boiling a few cups of water in the pot with the lid on.
When all food has been cleaned from the oven, wipe it dry and place on a gas stove or other heat source to thoroughly dry out the pores. I wipe a thin layer of cast-iron conditioner, olive oil etc., on my ovens after I dry them. Some other cooks do not. Just remember: If you keep the oven dry, it won’t rust.
Colleen Sloan, one sage of Dutch oven cooking, likes to fill a spray bottle with one part vinegar to four parts water to clean her ovens. She sprays the dirty oven while it’s still warm, puts the lid on for a few minutes, and then wipes the oven clean with a paper towel (repeat a few times for really stuck-on foods). I like to use this vinegar/water mix because it neutralizes any odors and disinfects the oven as well.
Some folks line their ovens with aluminum foil or purchase ready-made aluminum inserts to make cleanup easier. Will the aluminum hurt your oven? No. However, it will affect cooking time and evenness of heat, as well as alter the taste. Remember, keep your cast-iron pot well seasoned and cleanup will be a snap.
Store your ovens with the lid off or with a folded paper towel half-in/half-out of the oven with the lid on.

Jan 5, 2015

500+ FREE Camping Recipes + Dutch Oven Recipes

Mom with a PREP | 500 Free Camping & Dutch Oven recipes including how to build a buddy stove and some helpful hints for dutch oven cooking. FREE DOWNLOAD

If you’re like me, trying to come up with ideas for camping food can be daunting if you want to move past hamburgers, hot dogs and poptarts for you campsite. And if you’re beginning to live a more preparedness lifestyle, you’re looking to expand on your alternative cooking techniques and ideas for grid-down situations, be they days without power after a local, natural disaster or even something more long-term.
There is also a bonus rocket stove section to learn to make your own rocket stove to have in the wilderness (or even in your own backyard!).
These camping recipes were put together by Troop 26 Parkville (who gave their permission for me to share this download with you). These folks worked hard at putting together a great resource! Thanks!!! This would be an awesome thing to print out for your emergency binders and camping files. Enjoy and happy camping!

500 CAMPING RECIPES
DOWNLOAD HERE


Nov 19, 2014

Seven secrets of Dutch oven cooking

By Roger L. Beattie

Squatting heavily in dank basements, drafty attics, and dusty, cluttered garages, these three-legged hulks from a bygone era wait impatiently to release their treasures. Until then, they are pitted by time and tarnished by neglect. For those who will uncover the mystery, their gaping caverns can once again be brimming with magic.
From the birth of our nation, Dutch ovens have been an integral and versatile part of Americana. Sadly, today's high-tech hustle-and-bustle lifestyle has all but forgotten the art of “leather-glove cuisine.” The coal-black cast iron ovens appear outdated, unfriendly, and forbidding. Interestingly however, with seven simple secrets revealed, the beginning camp cook and the consummate backyard chef can utilize these forgotten friends to produce a marvelous and unforgettable variety of succulent delicacies.
Dutch ovens owned by cooks who understand their subtleties are kept in places of honor, sanctuaries reserved specifically for them. On the other hand, ovens owned by cooks who can't seem to keep the potatoes from burning to the bottom or who can never get the chicken to look anything but a pasty white, are quickly relegated to some obscure location where they will be “out of the way.” For the unsuccessful current user, the interested but uninitiated, or anyone who just wants to cook better, the seven secrets outlined below will provide a firm foundation for the creation and consumption of mouth-watering Dutch oven meals fit for even the most discriminating palates.

Secret 1: Choosing wisely

When deciding on a Dutch oven, there are a few important guidelines to keep in mind. A common question is, “Should I buy cast iron or aluminum?” Both have some advantages. Aluminum Dutch ovens weigh about one-third less than their cast iron counterparts. They require no curing, and, like the cast iron pots, can be used over open fires, buried underground, or used with coals or briquettes. However, aluminum Dutch ovens do not retain heat as well nor distribute it as evenly as cast iron. The flavoring of foods produced will also be different. Aluminum ovens sometimes give a chalky flavor to foods, whereas iron ovens give a smoked flavor to foods. Most Dutch oven aficionados use only cast iron ovens.
When buying a cast iron Dutch oven, whether new or used, look carefully at these five important areas:
1. Only buy Dutch ovens with legs. Some are manufactured with flat bottoms and are far more difficult to use. The three legs should be cleanly attached to the bottom of the oven, never cracked, bent, or broken off.
2. Check the fit of the lid. It should lie flush with the lip of the oven all the way around, with no significant gaps.
3. Check the casting, or thickness, of the metal, especially around the rim. There will be some inconsistencies. However, areas that are 15% (or more) thicker or thinner than the remaining areas will produce hot or cold spots during cooking and cooling. This variance in thickness will also make the oven much more likely to crack or warp.
4. Make sure the lid has a loop handle, cleanly attached to its center.
5. Check the bail (the wire handle) attached to the oven itself. It should be easily movable and strong enough to use for carrying or hanging a heavy pot full of stew without difficulty.
If these five areas pass inspection, you've got a good Dutch oven.
Another purchase consideration is the size of the oven. Dutch ovens range in size from 8 to 22 inches in diameter. The most commonly used are 10-inch, 12-inch, and 14-inch ovens. The larger ovens hold more if you're cooking for large groups, but they are huge, heavy, and hard to handle If you only buy one oven to get started, pick a 12-inch. Later you can add a 10-, 14- or additional 12-inch ovens.

Secret 2: The miracle cure

Once you have an oven, it must be cured. This process will keep your oven from rusting and produce an interior coating that will prevent food from sticking. The process is very simple. If you have an old rusty oven, scrub it well and use a fine-grade sandpaper to clean up and expose the entire surface, inside and out. Once the metal is exposed—or if you are curing a new oven—wash the entire oven well with hot soapy water. This will remove the waxy coating from a new oven and the fine metal dust remaining in an old reconditioned one.
Next, heat your Dutch oven, with the lid on, to about 200° in the oven in your home. (You can also do this in a fire, with coals or briquettes.) While the oven is hot, pour or drop in a small amount of oil, shortening, or lard, and while wearing oven mitts or heavy leather gloves, use a clean cotton cloth to wipe the entire surface well, inside and out, to coat it with the shortening, oil, or lard. When the oven is coated, heat it to 350° for an hour. If you do this in your house, expect some smoke. After an hour of heating, let the oven cool slowly. Force-cooling a cast iron oven by putting it in a freezer, snow bank, or outside during a cold rain, can crack or warp it.
Once you have your oven cured, it is ready for cooking. However, after each subsequent use and cleaning, you maintain and strengthen the cure by wiping a very light coat of oil, shortening, or lard over the dry, warm oven.
The proper cleaning of a Dutch oven is a favorite topic of many cast iron cooks. Some say that excess food must be burned off by turning the oven over in a fire, or by putting the lid on and heating the oven until the food residue inside is burned to a black crust or dust (like a self-cleaning household oven). Others claim it is a mortal sin to use any kind of soap when cleaning Dutch ovens. All, however, agree that you never scrape or scour a Dutch oven. Using metal utensils or wire scrubbers or brushes can remove the curing and allow food to stick in the exposed areas unless the oven is re-cured.
Most frequent Dutch oven users have found that wiping out excess food with a paper towel, then washing the pot with hot soapy water and a sponge will produce a clean and sanitary oven. Remember, after cleaning, be sure to dry the oven completely, then wipe a light coat of your chosen oil over the entire surface of your oven, inside and out, legs included, using a paper towel or cotton cloth. Soon your oven will have a beautiful dark brown or black coat that will be amazingly easy to keep clean.
If you use too much oil while curing or after cleaning your oven, it will become apparent the next time you use it. Each time you take out the oven, remove the lid and smell the inside. If it smells a little rancid, you used too much oil, but don't worry. Just heat up the oven on your stove or over a fire to allow the oil to melt down and puddle in the bottom of the pot. Wipe out the old oil with a paper towel and you're ready to go. There is no need to clean the oven again before using.

Secret 3: Power tools

You will need all the usual utensils required for cooking, such as spoons, forks, spatulas, etc. However, when you pick utensils to use with your Dutch ovens, choose items made of wood, plastic, or Teflon. Metal utensils tend to scrape off the curing when hungry eaters try to dig the last bite of food out of the oven. If areas do get scraped to the bare metal of the oven, you'll need to re-cure it.
In addition to the utensils you are familiar with, there are other tools unique to Dutch ovens which will make your efforts safer, easier, and more successful.
1. You will need a pair of loose-fitting leather gloves long enough to cover your wrists.When leather gloves get hot, loose ones can be flipped off easily and quickly. Tight hot gloves will stick and burn you. Some people prefer welding gloves (gauntlets), but any good thick leather gloves should do fine. Wear these gloves when working with your ovens. They will prevent numerous painful burns, dropped ovens, and ruined meals.
2. Another tool you will need is a lid lifter. There are a number of lid lifter designs to choose from. The most typical is a wire-handled hook. Many of these hooks have a small bar welded horizontally a short distance up the handle from the curve. This is to keep the lid from tilting from side to side while being lifted. Hook lifters can be very ornate or simple hay-hook-like designs. Probably the surest lid lifter is a more recent design which combines the hook with a three-legged brace. The three legs fit flush against the top of the lid, and the hook goes down the middle of the legs and under the lid handle. With this type of lifter, the hook is pulled up to tighten the lid against the three legs of the brace. This design is steady and excellent for keeping coals and ashes on the lid from accidentally becoming additional garnish for the dish being prepared.
3. Lid holders are also a necessity. This tool may be anything from a clean brick to a three- or four-legged wire rack. It is used to keep hot lids off tables and counter tops or out of the dirt when the cook is adding spices or checking the progress of meals cooking.
4. Long-handled tongs are an invaluable addition to your Dutch oven tools. Even a cheap stainless steel pair will last indefinitely. Tongs are used to place, add, or remove coals as necessary. Attempting to position coals with sticks, pliers, etc., often results in poor placement, burned hands, and generally miserable experiences.
5. A small shovel is also important. This small tool, a garden shovel or fireplace shovel, is used for moving coals from a fire, digging a long-cook pit, or burying excess extinguished charcoal.
6. The last special tool you will want to consider is a whisk broom. The broom is used to brush the dirt, ashes, etc., off the lid and side of your oven in preparation for serving. This makes the possibility of ash-flavored beans remote and cleans up the ovens nicely to prevent carrying dirt or charcoal into your camper, cabin, tent, or kitchen.

Secret 4: A fire in the belly

Here's a secret that even most seasoned outdoor cooks don't know: You can prevent burned bottoms, raw tops, and dried-out foods by using properly sized and spaced coals to control the interior oven temperature. Virtually all baked goods can be baked successfully at 350°, which is the ideal temperature for a Dutch oven. To establish and maintain this temperature, the first thing to remember is to use coals from a fire that are roughly the same size as charcoal briquettes.
Or, for more consistency, use briquettes. Charcoal briquettes will burn longer and more evenly than coals from a fire. Use the best briquettes you can afford. There is a difference in quality, and the more expensive brands are generally worth the additional cost.
The number and placement of the coals on and under your oven is critical.The optimal number of coals used for any oven is based on its diameter. For example, if you are using a 12-inch oven, you will need two coals per inch, a total of 24. More coals will likely burn your food and less may necessitate too long a cooking period. To determine how many coals go under and how many go on top, remember the magic number 2:
· 2 coals per inch of oven diameter
· place 2 more coals than the oven size on the lid, and
· place 2 less than the oven size under it.
Example: For a 12-inch oven, 12 - 2 = 10 coals under the oven, and 12+2=14 coals go on the lid, for a total of 24. The same formula applies to all ovens. A 10-inch oven should have 8 coals underneath and 12 coals on the lid. A 14-inch oven should have 12 coals underneath and 16 coals on the lid.
The placement of the coals is also an important part of proper heat regulation. The proper layout for coals or briquettes under the oven is circular. Coals should be approximately one inch apart in a circle under the oven. Never place coals directly under the center of the oven. If you do, you will create a hot spot and burn whatever you are cooking. By placing the coals in a circle, the natural conductivity of the oven will distribute the heat evenly and effectively.
The coals on the lid of the oven should also be placed evenly in a circle along the flange of the outer lid. However, four of the coals should be placed toward the center of the lid, two on either side of the handle. This coal placement will produce an even, consistent temperature within the oven of approximately 350° and maintain that heat for up to two hours.
In the event that you need to generate a higher temperature inside your oven, “cheat up” the coals. Additional coals placed two at a time, one on the lid and one under the oven, will add another 50°. Two additional coals top and bottom would bring your oven's temperature up to 450°. It is extremely rare to need a temperature of 450°, and you should never need one higher than that.

Secret 5: A cut above

Meats prepared in a Dutch oven are delectable. They have a flavor and aroma you will never duplicate using any other cooking method. While the taste is always exquisite, some Dutch oven users have difficulty producing a visually appealing meat from inside the steamy oven. The secret is simple: regardless of the spice and flavorings you use on any meat or poultry, always brown the meat first.
To brown the meat, place some oil, bacon, or any fatty item in the hot oven to produce a good covering of oil on the bottom, heat the oven, then put the meat you want to cook in the oven and sear or brown it well. This will seal in natural juices and provide the outer texture and color more typical of grilled or fried meats. Once the meat is well browned on all sides, drain off any leftover fat drippings, add whatever seasonings you like, put on the lid, and cook the meat for 30 to 35 minutes per pound of beef, pork, or lamb, or 25 to 30 minutes per pound of poultry.

Secret 6: Garden pride

Garden vegetables are a magnificent addition to any Dutch oven dinner. Most Dutch oven vegetables are prepared in a sauce of some type, but they may be steamed or boiled as you would on a traditional stove. However, if you choose to bake or roast Dutch oven vegetables, they should cook for approximately three minutes per inch of oven diameter. A l0-inch oven full of squash should cook for about 30 minutes, a 12-inch oven full for 36 minutes. Vegetables to be cooked in sauces, such as sour cream potatoes, broccoli in cheese sauce, or new peas and potatoes in white sauce, should be brought to a rapid boil first, the water discarded, the sauces added, then baked for the proper time noted for other vegetables.

Secret 7: If you knead the dough

Good Dutch oven breads seem to be a rarity. However, marvelous corn breads, biscuits, rolls, and sourdough loaves are surprisingly easy to perfect in the old black pot. The larger the oven the better when it comes to cooking breads. A 14-inch oven serves nicely to produce three loaves of bread or up to three dozen rolls or biscuits. To successfully brown breads, however, you must alter the cooking process for the last five to eight minutes of the traditional 25-30 minute, 350° baking time.
First, put a light coat of oil on the interior of a cool oven (including the lid), and let the rolls or bread complete their final rise in the oven prior to applying the coals. Second, place the oven on the coals with the proper number of coals on top as noted earlier. (Remember: no coals directly under the center of the oven.) Third, when there are five to eight minutes left in the cooking time, lift the lid, lightly brush the tops of the breads with butter, replace the lid, then take all the coals from under the oven and distribute them evenly on the top. With all the heat now on the lid, check the bread every couple of minutes until you think it looks perfect. After brushing the coals and ashes from the lid, remove it, tilt the oven over a bread board, and your perfect bread will gently fall out.
Now that you know the seven secrets, here is a trio of fabulous tried-and-true recipes you can easily make with your old, new, or reincarnated Dutch oven.

Prairie chicken

Using the correct number of coals under the oven, brown both sides of enough clean, uncoated chicken pieces to cover the bottom in a hot Dutch oven with a bubbling ¼ inch of oil. When the chicken is browned to your liking, remove the excess oil from the oven and discard. Season the chicken generously with the following pre-mixed coating:
2 Tablespoons each, parsley flakes & thyme
1 Tablespoon each, marjoram, oregano, celery salt, & rosemary
1 teaspoon each, garlic salt, onion salt, ginger, ground black pepper, sage, & paprika
Put lid on oven, arrange coals as noted earlier (top and bottom) and cook for 45 minutes to one hour.

Italian zucchini

Coat and marinate zucchini or summer squash (one per person) for 30 minutes in a mixture of ½ olive oil and ½ lemon juice (A half cup of each will coat enough zucchini for 20 people.) Place one layer of the marinated vegetables in the bottom of the Dutch oven. (A 10-inch oven works great for up to 15 people.) Sprinkle salt, pepper, and a good coating of grated Romano cheese over the layer, then repeat the process, layer upon layer, until all the zucchini is used or until the oven is almost full. Sprinkle extra Romano cheese on the top layer. Place the lid on the oven and cook as noted earlier with the proper number and placement of coals. Cook for 30 to 35 minutes. This is a marvelous tart and tasty vegetable treat, guaranteed.

Trailside beans

½ pound bacon, sliced in small pieces
½ pound ground beef
½ diced onion1 diced red bell pepper
1 diced green bell pepper
Two 33-oz. cans of pork and beans
½ cup brown sugar
¼ cup of Worcestershire sauce
2 Tablespoons of white vinegar
Cook bacon and ground beef well in a 12-inch Dutch oven. Use 24 coals all on the bottom to start, then separate and place the coals as noted earlier during the baking stage. Before removing excess oil, sauté diced onion, diced red bell pepper, and diced green bell pepper with the meats until the onions and peppers are soft. Drain off excess oil. Add pork and beans, brown sugar, Worcestershire sauce, and white vinegar. Stir well, place lid on oven, and cook with repositioned coals for 90 to 120 minutes.
Check for moisture content every 15 to 20 minutes. (Some ovens allow too much moisture to escape.) If there is not a soupy layer of liquid covering the beans, add water, a little at a time, and stir to maintain the moisture content.
Eat this with hot biscuits and jam, and you'll understand why cowboys always looked so happy on those long, hard, dusty cattle drives.

http://www.backwoodshome.com/cgibin/pf.cgi

Nov 2, 2014

Dumplings Instead of Bread?


It just popped into my head that sometimes cooking outdoors might make it hard for some to bake bread with their supper.

Why not just use your favorite dumpling recipe and spoon the dumplings right on top of your stew to cook.

One pot, no fuss, no muss!!

Blessings,  Suzanne

Aug 31, 2014

Cooking Without Electricity

cooking-without-electricity-coleman-camp-stove

If the power goes out (grid down) and the electricity is off for a period of time, you will need an alternative method of cooking without electricity. Even your kitchen’s gas stove might require electricity to operate, so it’s best to consider multiple ways to cook and/or to boil water.
Here are a few ideas:


One obvious cooking alternative is by way of a wood fire, perhaps with a cooking grate placed over it supported by logs, stones, bricks, etc.

A ‘rocket stove’ is an efficient way of utilizing a controlled burn of a wood fire – a method which uses little firewood to create a quick hot fire. There are several popular varieties available.

A Dutch oven cooker either hanging over an outdoor fire or setting directly in a bed of hot coals (or hot coals on top of the Dutch oven’s cover) – perhaps in your fireplace if you have one. Good Dutch ovens are made of cast iron (they retain heat longer).

The issue with cooking over a fire is that it must be done outdoors. Weather may be an issue. This will probably not be an option for anyone living in the city or much of suburbia depending on your location.

Your barbeque grill is a likely option for cooking without electricity (until you run out of fuel), be it charcoal or propane gas. Always keep a full (large) tank, and preferably an extra tank (filled). If you use charcoal, when it goes on sale buy extra bags.

Again, weather and season may be an issue because you will have to cook outdoors. Preferably you’ll have a protected outdoor area for cooking which will make it a bit easier during bad weather. NEVER cook indoors with a bbq grill.

A solar oven can be very effective during the summer months, during days when there are few clouds – however this will be a limited use option. Nonetheless a solar oven is yet another alternative method of cooking if you are so inclined. Your geographical location, weather, season, and the efficiency of the solar oven will affect your overall success. I happen to have this solar oven and have used it with very good success.

‘Sterno’ heat (canned heat) like those which are used by caterers – may be used indoors and are effective for cooking. The canisters contain an alcohol-based ‘gel’ fuel – which does not spill and will burn for a few hours. You will need some sort of stand to hold your cooking pot over the canister.

There are all sorts of camping stoves which will enable cooking without electricity. Some of them are fueled from small butane canisters, many others use propane, and still others by liquid fuel (e.g. Coleman white gas).

Be wary of exhaust fumes, and unless your specific camp stove indicates that it is safe to cook indoors – assume that it is not.

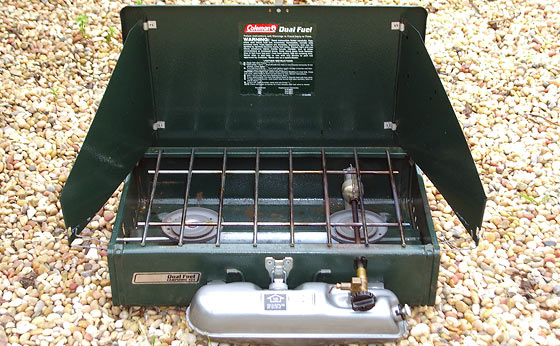
One popular camp stove which has been around ‘forever’ is the Coleman camp stove. I have had two of their dual burner liquid fuel stoves during the past 20 years and have been very happy with them. They seem to be built to last.

Coleman 2-Burner Dual Fuel Stove
Coleman 2-Burner Propane Stove

I use the liquid fuel model because it seems a bit more rugged, it holds larger pots without issue, it will heat up very quickly, and I’ve simply been familiar with it for many years. I believe that liquid fuel is more practical when it comes to storage space versus the propane canisters because you will get far more cook time from a gallon can of white fuel versus an equivalent size can of propane fuel (for example).

White gas‘, is a special Coleman blend which is orderless, has rust inhibitor in it, and is available in one gallon cans at nearly every store that sells camping supplies.

Although the Coleman white gas fuel has a supposed shelf life, i’ve used it far beyond a supposed expiration, and have had zero problems (as in 10 years!).

According to Coleman documentation you can even use unleaded gasoline in their dual-fuel model stove as a substitute for their Coleman fuel white gas. I have not tried this, but it is good to know of an alternative fuel source.

A one gallon can of Coleman fuel will provide quite a lot of cooking time, and is well worth stocking

several, or more, in your survival preps if you have this type of stove. Coleman white gas
I’ve even read comments reporting no problems or issues with the fuel even after 15 years, as long as the screw top is secured. Just remember to filter the Coleman fuel as it is poured into the tank, in case of sediment. Unleaded gasoline however will not store well for that long, and I recommend adding a fuel stabilizer additive such as PRI-G or STA-BIL if it will be stored beyond several months.

During emergency cooking without electricity, be aware of safety considerations – especially since this is not your normal way of cooking. Consider ventilation, the dangers of fuels, and the dangers of fire itself.

http://modernsurvivalblog.com/preps/cooking-without-electricity/#more-636

Jul 8, 2014

Reconditioning & Re-Seasoning Cast Iron Cookware

Reconditioning & Re-Seasoning Cast Iron Cookware
 
I LOVE cooking with cast iron. As more reports come out about the dangers of nonstick pans and the toxins that they can emit, I appreciate my cast iron cookware more and more. They distribute heat evenly, can stand up to almost any abuse, and will last for many years - some of the pieces in my collection are around 100 years old!

Most people I know think that cast iron skillets are solely for making cornbread or for frying. I use mine for everything from homemade cinnamon rolls & scrambled eggs, to steaks and roasted chickens. The only thing I DON'T do in my cast iron is boil water.
I seek out older cast iron pieces, made back when the pieces were machine polished to a smooth glassy surface after casting. All newer pieces are simply cast, and will have a more textured surface. Since I prefer old pieces, I typically find cast iron cookware in poor shape; neglected, rusty, and coated with years of caked-on burned food and seasoning. Luckily, these pieces can be fully restored for just a few dollars, a bit of elbow grease and patience.

Greg has a great restoration tutorial over on his Black Iron Blog. His method is the one I have used for over 10 antique pieces so far, all with amazing results.
 
I picked up this Birmingham Stove & Range skillet and this Griswold skillet at a local junk store. Both pieces have some surface rust as well as caked-on seasoning and grime. But, both set flat and do not have any cracks. I've found that, the grungier & rustier the piece, the cheaper the price.
 

Birmingham Stove & Range Skillet, made here in Birmingham, AL. Picked up for $5.00.

A heat ring on the bottom is usually a good sign that the piece is an old one.

Griswold Skillet; one of the most sought-after brands by collectors. I got this one for $16.00 and have seen this exact same skillet go for $175.00+ on eBay.
The bottom shows a lot of old seasoning that has built up over time.

All that is needed for the reconditioning process are a few inexpensive, readily available items:

Heavy-duty Oven Cleaner (I used Easy-Off)*
Gloves
Garbage Bags
White Distilled Vinegar
Steel Wool (#0000)

*EDIT 05/2012* This post has become VERY popular recently thanks to Pinterest! Since some commenters have had some concerns about the oven cleaner, I wanted to give a little more information about the chemicals. Oven cleaner contains lye, which IS a caustic agent, typically sodium hydroxide or potassium hydroxide. The lye residue is washed off of the skillet, neutralized with an acid soak (vinegar), then washed again and coated with seasoning.Lye is used in many everyday items such as soap; it also shows up in food preparation, from olive curing, to lutefisk (eww), to making authentic pretzels. It's also used for biodiesel!

Lye is very hygroscopic, meaning it will pull moisture out of the air. This is why, when being used on grimy cast iron, the aerosol foam ends up becoming a brown liquid. It's dissolving when it contacts the air, which results in VERY little if any of the lye being absorbed into the metal.

Even groups such as the Griswold & Cast Iron Cookware Association RECOMMEND the oven cleaner method for reconditioning cast iron.

Some people advise using high heat or a self-cleaning oven cycle (which uses high heat) to clean cast iron. I shy away from this method mainly because the majority of my cast iron collection is antique. High heat CAN and WILL warp or even crack fragile cast iron. Plus, my oven doesn't have a self-cleaning cycle. I also can't simply throw my cast iron in a fire, being that I live in the suburbs, and setting yard fires is strongly frowned upon here!

*EDIT 06/2013* This method is for 'plain' cast iron ONLY. It is NOT for enameled cast iron such as Le Creuset. Do NOT try this with enameled cast iron.
Coat the cast iron piece (top and bottom) with the oven cleaner, making sure to wear gloves. Oven cleaner is basically aerosolized lye foam and is very caustic. It WILL burn your skin. Place the coated piece in a garbage bag and seal tightly to prevent the oven cleaner from drying out.

Griswold Skillet, coated in Easy-Off Heavy Duty oven cleaner

Four skillets, coated in oven cleaner and bagged.


This is where patience comes in. You will need to wait several days for the oven cleaner to loosen and remove the old seasoning. I usually check after 2 days, then wipe off the cleaner and apply a fresh coat and check again after 3 days.

Griswold skillet after a 2-day soak in oven cleaner.
For especially grimy pieces, letting the pieces soak for about a week is usually sufficient. Once the old seasoning has been removed, the skillet will be restored to it's original cast. The iron will be a silvery-gray color. There may still be surface rust present, which has to be removed before the skillet can be seasoned.

Remove the lye and old seasoning by wiping off the grime with a paper towel and then washing the skillet with hot water.

Next, the lye needs to be neutralized, and any surface rust will need to be softened to make it easier to remove. Soak the cleaned skillet in a 2:1 solution of hot water and white distilled vinegar for 30-60 minutes. This should soften any surface rust enough that it can be easily scrubbed away with steel wool. Wash the skillet with soap and hot water and dry it thoroughly.

Birmingham Stove & Range skillet after a 5-day soak in oven cleaner.


Birmingham Stove & Range skillet after a vinegar soak to remove rust.
At this point, the skillet has been cleaned down to the bare metal and must be seasoned immediately to prevent rusting (especially here in Alabama with our humidity!).

To season, place the cleaned, dry skillet upside-down in a 250-degree oven for 15 minutes. Increase the temperature to 500 degrees and let the skillet heat up for 45 minutes. At this point, the skillet will be EXTREMELY hot, so be careful removing it from the oven. Turn off the oven.

Season the skillet with a coating of lard. I render my own lard for cooking and baking, but use inexpensive storebought lard for seasoning. Some people also use shortening (Crisco) or olive oil. Rub the lard all over the entire skillet with paper towels; the hot skillet will absorb the oil and begin to turn brown. The oil will likely smoke as well; this is normal. Using clean paper towels, rub off the excess oil so that the skillet just appears wet. With seasoning, like painting, your aim should be for multiple thin layers rather than a single thick layer.


Return the oiled skillet to the oven (upside-down to prevent pooling) and let the skillet cool while the oven cools. Wipe any excess oil off every 10-15 minutes to prevent any pooling or buildup. Every 30 minutes or so, repeat seasoning with a fresh application of lard or oil, remembering to wipe off the excess oil. After one hour, open the oven door slightly to help cool the oven faster.

At this point, the skillet should be completely reconditioned, seasoned and ready for use.

Birmingham Stove & Range Skillet, Before & After


Birmingham Stove & Range Skillet, Before & After

Griswold Skillet, Before & After

Griswold Skillet, Before & After

It will take time and additional layers of seasoning before the piece becomes black and glossy. To preserve the seasoning, do not use soap on the skillet unless absolutely necessary.

The best way I have found to care for my cast iron is to clean the pieces while still hot after cooking. My well-seasoned pieces need little more than a wipe with a clean paper towel. On occasion, depending on what was cooked, I will use hot water and a nylon scrubber (see the Amazon link below for the brand I prefer). Afterwards, I towel-dry the skillet thoroughly and warm it over a low to medium-low burner to be sure that all of the moisture has evaporated. I then apply a tiny bit of lard to the skillet while still hot, and, using clean paper towels, remove all of the melted lard except for the thinnest possible layer.

I also store my skillets stacked with paper towels in between each one to prevent scratching and to absorb any moisture.

The best way to quickly build up a good layer of seasoning on cast iron? Use it! Cook as many meals as possible in your cast iron. It will thank you with years of use and provide you with an heirloom piece of cookware to pass down to another generation.

Jul 1, 2014

Cooking With Cast Iron—How And Why To Get Started

Cooking With Cast Iron—How And Why To Get Started


Cooking with Cast Iron.  Choosing Your Cast Iron Cookware Pieces.  Reasons To Use Cast Iron Over Other Cookware.  Care Of Traditional Cast Iron Cookware
 
This is a guest post by Jennifer Osuch.

Cooking with cast iron was one of the first back to basics moves I made; I wish I could say it was intentional, but the truth is I fell into it out of circumstance. When my sons were younger my husband and I led their Cub Scout pack, and over the years of endless campouts I learned to cook in Dutch ovens over campfires because I wanted my boys to have healthier food than traditional pre-packaged “camp food”. I’m a seasoned (pun intended…) cast iron user and I’ve been battling it, loving it, and learning from this traditional cookware for years. Yes, I say “battling” it because I didn’t know how to take care of it in the beginning. It’s not hard to take care of or hard to use; it’s just a little different. Luckily, the years of battling are over and now I’m just loving it. Let me share with you what I’ve learned.

Cooking with Cast Iron.  Choosing Your Cast Iron Cookware Pieces.  Reasons To Use Cast Iron Over Other Cookware.  Care Of Traditional Cast Iron Cookware
 
There are two kinds of cast iron cookware on the market today, the traditional kind and enamel coated. The traditional kind is usually black (from the seasoning) and is what most people picture in their head when they think of cast iron cookware. Enamel coated cast iron cookware is simply cast iron that has been coated with enamel for easier care. Enamel coated cast iron is easier to care for in the beginning because you don’t have to season it and you get all the benefits from cooking with cast iron. However, it can be expensive and the coating can scratch or chip. Enamel coated cast iron also can’t be used in most off-grid cooking situations (except for solar cooking). I’m going to be talking about the traditional kind of cast iron cookware throughout the rest of this post, since it’s the type that needs a little extra attention.

Cooking with Cast Iron.  Choosing Your Cast Iron Cookware Pieces.  Reasons To Use Cast Iron Over Other Cookware.  Care Of Traditional Cast Iron Cookware

Choosing Your Cast Iron Cookware Pieces

You can purchase almost any size cast iron cookware fairly easily. In recent years it has become popular again. It’s one of those “what’s old is new again” crazes because people are realizing other cookware is often not safe to cook with. You should purchase cookware based on what you cook most and the size of your family.

Skillets: Most people start off with a 10in skillet. I recommend 12in if you have hungry boys like I do. Your skillet can be used for stir-frying, pan-frying, broiling, baking, roasting and simmering. I use my 12in skillet to cook everything from spaghetti sauce to cornbread.

Dutch Ovens: Dutch Ovens are also called camp ovens. They can be used for larger recipes as a simple pot or they can be used as a slow cooker. When used as a slow cooker they are especially good for cooking large cuts of meat which would otherwise be difficult to cook in an off-grid situation. They can also be used, as the name implies, as small ovens so you can bake cakes and other treats in them. In order to bake you must have a lid that will allow you to easily place coals on top, since the Dutch Oven must be heated evenly on the top and bottom for baking.

Griddles and Grill Pans: You can use a cast iron grill to roast vegetables or a griddle to fry pancakes. The griddle heats evenly so you don’t have a pancake that is done in one area but not in another.

Reasons To Use Cast Iron Over Other Cookware

  1. Off-Grid Cooking- One of the biggest assets to cooking with cast iron is that it can be the only cookware you own. You can cook in any environment with one set of cookware. This saves money and storage room. It also insures that you will have cookware no matter where you are cooking or in what situation you find yourself.
  2. Naturally Non-Stick- Cast iron is naturally non-stick because of the patina that forms when you season the cookware. If you treat your cast iron like you would any other non-stick cookware and use appropriate utensils (I use wood) the coating will stay on and prevent food from sticking
  3. Lasts Forever- You can’t wear out a cast iron skillet. The truth is that the older they get the better they perform because over time the surface gets smoother. So you save money by not having to replace your cookware every few years.
  4. Heats Evenly- As I mentioned above cast iron heats evenly which prevents food from burning and drying out.
  5. Non-Toxic- Cast iron cookware is made of, you guessed it, iron… It’s not made of Teflon or some other toxic or questionable material. You can feel comfortable cooking for your family with cookware that has been proven safe through the ages. Actually, if you do cook with cast iron there may be a health benefit – some of the iron leaches into the food to give you a boost in your iron intake.
  6. Can Be Used With High Heat- Cast iron can go from the stove to the oven to the campfire with no problem. This can save time and effort as you can start a meal in a skillet on the stove and finish it in the same skillet in the oven.
  7. Easy Care and Clean-up- Yes, I know some of you are skeptical, but once you get the hang of it cast iron is as easy to care for as any other non-stick cookware.

Care Of Traditional Cast Iron Cookware

Food will stick to cast iron if it’s not seasoned. Seasoning is the process of coating cookware with oil and then heating it so a patina (or thin layer) is formed from the cooked oil. Most cast iron sold today comes pre-seasoned, and the older pieces you might find at a thrift store or yard sale will most likely be seasoned. You have to continually add oil or fat to keep your cookware seasoned. If you cook with a lot of oil or fat you might not have to do what I call “maintenance” seasoning. However, most of us try to watch our fat intake, even from healthy fats, and you actually cook with less oil in a well-seasoned cast iron pan. So here’s a simple care procedure:
  1. Use a non-stick surface scraper to remove unwanted food from the pan.
  2. Rinse your pan out with water. There is a bit of controversy about using soap to clean your cast iron cookware. Many people swear by not using soap. I generally do not use soap but there is a risk of bacteria staying in the pan. So if someone in my family is sick I might use a bit of soap. The heat will eventually kill the bacteria but it might not kill it right away since the oil application is done at a low temperature. Never place a hot pan or pot in cold water because this could cause cast iron to crack.
  3. Dry completely. This is important because cast iron will rust if moisture is left on the surface too long. If your pan does rust use steel wool in the affected area. Then proceed to the next step.
  4. Heat your pan on low to medium heat.
  5. Apply a thin layer of oil with a lint-free cloth. You can use bacon grease, lard, coconut oil or any other high heat oil (I use coconut oil). Applying too much will cause the pan to be sticky. Let it cool and wipe off the excess oil.
There is also some debate as to whether you should do #4 and #5 every time you use your cookware. I do it every time I use my cast iron. If you wait and only do it occasionally it will be more difficult because you’ve let your coating deteriorate. If you get in the habit of doing it each time you’ll never have a problem. Do not place cast iron in the dishwasher – it will rust!

You should store your cast iron without a lid to keep rust from forming, especially if you live in a humid environment. I do stack my cookware and sometimes I do store them with the lids loosely on, but I place a brown paper bag in the bottom of the pan or pot to absorb moisture and excess oil.

Cooking with Cast Iron

  1. Pre-heat your pan if frying. Too much heat too fast can also crack a cast iron pan.
  2. Treat your pan like any other non-stick cookware and do not use metal utensils.
  3. Cook over low heat. Since cast iron heats evenly you don’t need as much heat.
  4. Remove acidic foods as fast as possible. Don’t leave spaghetti sauce sitting in you pot. (Acidic foods will have a darker color when cooked in cast iron because of the iron absorption.)
  5. Do not store food in cast iron cookware. Cast iron will rust from the moisture in the food.
Cautions To Consider
  1. Do not boil water routinely in your cast iron pots because it will take off the seasoning.
  2. Cast iron is heavy. This is a good thing for most of us who could use a little weight lifting in our lives, but extra caution should be taken with children and adults with limited mobility.
  3. Caution should be taken if you suffer from Hemochromatosis or iron overload.
  4. Also, there is some debate about the type of iron absorbed through cooking with cast iron, as to whether it can absorbed by the body because it’s not organic iron. You can read more about this at http://learningandyearning.com/cast-iron
Even though I started cooking with cast iron outdoors it quickly made its way into my indoor kitchen for all the reasons listed, and has become my favorite cookware. Even if you’ve been intimidated or frustrated with cast iron in the past I hope you will give this traditional cookware another try. Let me know how it goes!