Jun 29, 2014

Los Angeles, Las Vegas, Phoenix and other cities headed for imminent water supply collapse; wave of drought refugees now inevitable

Los Angeles, Las Vegas, Phoenix and other cities headed for imminent water supply collapse; wave of drought refugees now inevitable

water

Sunday, June 29, 2014
by Mike Adams

(NaturalNews) One bizarre trait that strongly characterizes modern human civilization is a widespread inability to plan ahead. On every issue imaginable -- debt spending, fossil fuels, health care costs, resource extraction and so on -- our citizens and political leaders demonstrate near-retarded cognitive function by failing to see where their actions might lead. (And it's almost as if they're proud to be so stupid, too.)

There's no better example of this than the city of Las Vegas, Nevada -- a city of 600,000 people who almost universally depend on one lake for their water.

And that lake is running dry at an alarming rate, after which there will be no more water for Las Vegas.

The lake is called Lake Mead, created by the Hoover Dam. Back in 1936, when the Las Vegas population was very tiny by today's standards, Lake Mead took six years to fill with water. Now, with over two million people in the greater Vegas region depending on its water, Lake Mead has dropped by 50% and is receding with alarming speed.

Where is all the water going? It's being siphoned off by large tunnel "straws" that redirect the water 25 miles to the city of Las Vegas. These straws, however, are sucking the lake dry. Tim Barnett, a climate scientist at the Scripps Institution of Oceanography, explains it this way in a Telegraph news story (1):

The situation is as bad as you can imagine. It's just going to be screwed. And relatively quickly. Unless it can find a way to get more water from somewhere Las Vegas is out of business. Yet they're still building, which is stupid.

Ah, but "stupid" is popular, you see. Delusional thinking is embedded into the American culture at every level: medicine, finance, security, fossil fuels, the food supply and more. After all, only delusional thinking would allow continued real estate development in a city with no future water supply, yet it continues to this very day in Las Vegas.

The collapse of Las Vegas is now inevitable

Barnett predicts the city's water supply will collapse when Lake Mead runs "bone dry" in less than 20 years. Rob Mrowka, a Las Vegas-based scientist at the Center for Biological Diversity, agrees with his assessment, saying:

The drought is like a slow spreading cancer across the desert. It's not like a tornado or a tsunami, bang. The effects are playing out over decades. And as the water situation becomes more dire we are going to start having to talk about the removal of people (from Las Vegas).

Mrowka, like anyone who applies rational thinking to the problems facing America today, will of course be aggressively ridiculed and condemned by the delusional-weavers. The greatest sin to commit in a society steeped in delusional thinking is to tell the truth about where things are headed. That's not something people want to hear, especially when the all the fountains at the Bellagio are so pretty.

Las Vegas currently uses 219 gallons of water per person, per day -- one of the highest figures in the nation. That this is taking place in a desert is extreme stupidity, and it proves the point of this article: humanity is shortsighted and living in a delusional fantasy where people think they never have to deal with the long-term effects of present-day actions.

Attempts to resolve this water shortage problem are themselves steeped in stupidity and desperation: Vegas is trying to build a desperate water pipeline by spending over $15 billion to pipe in billions of gallons of water from another water source 260 miles away, but this project has been halted by the courts due to environmental concerns. Even if the pipeline were built, it only delays the inevitable. Building a city in the desert and importing the water supply simply isn't sustainable because there's just not enough rainwater nearby to go around. Duh.

The coming water wars of the Western USA

Truth be told, much of the Western USA is in the same dire situation as Las Vegas. Cities like Los Angeles were founded in the desert, then artificially supplied with water that's literally pumped over a mountain. If those pumps are halted for any reason, Las Vegas immediately reverts to a desert, and the city becomes a death trap for its millions of residents who rapidly discover they are living in a desert.

Even when the water is pumping, the entire state of California -- yes, 100 percent -- has already been classified as being in a state of "severe drought." Imagine what this looks like without the imported water.

Phoenix is also a city that's too large for its water supply. Nearby Tucson suffers much the same problem. Nevada, California, Arizona, New Mexico and Utah are all wildly unsustainable in terms of water supplies. They all depend in part on the Colorado River, but that River is also headed for imminent collapse.

High population cities not sustainable in most of the Western half of the United States

To fully grasp the seriousness of this situation, you might find it useful to scan this rainfall map of the United States:


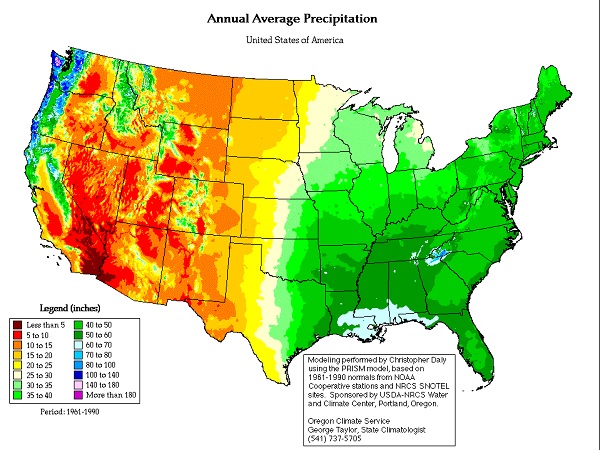
Every large city in an orange or red portion of this map is headed for collapse. This covers the majority of the Western half of the nation. Refuge areas will be those with plentiful rainfall such as the Pacific Northwest and regions far East of the Rockies.

This is why so many people are already headed to Central Texas, by the way. If you look at Texas, you'll notice it's clearly divided in terms of rainfall. Austin is roughly the dividing line, and everything West of Austin is bone dry, with little or no topsoil. East of Austin, you start to get precipitation which rapidly accelerates as you head toward Houston or East Texas, where patent trolls live in mucky swamplands and file lawsuits against technology companies.

This map might as well be called the "American migration map of 2050," because it shows where people will be forced to evacuate (areas in RED) and where they will be headed (areas in GREEN).

"The Colorado is essentially a dying river," says Mr. Mrowka. "Ultimately, Las Vegas and our civilization in the American South West is going to disappear, like the Indians did before us." (1)

No one is more hated in America than a truth-teller

Of course, anyone who dares point out this obvious fact in the USA is immediately branded a "conspiracy theorist" or a "doomsday pessimist." The politically correct stance on all this in America today is to live in the proper state of delusional denial that's socially acceptable.

Never mind the fact that these large U.S. cities -- Los Angeles, Phoenix, Salt Lake City, San Diego and more -- will collapse into ghost towns long before the year 2100. Yet we are told, instead, to worry about global warming because it might raise the sea level by two inches over that period of time. Global warming is the "popular fear" of the day, you see, but the truth about the dwindling water supply of cities like Los Angeles is simply imagined away as if the problem didn't exist at all.

Ironically, the most likely attempts to solve the water crisis will involve worsening global warming by burning coal to run energy-intensive desalination plants that produce fresh water. There's plenty of water to go around, after all, if you can just remove all the salt from it. But that process requires an enormous amount of energy at great expense. Desalinated water is so expensive that the mere act of washing your own car in your driveway might use $25 worth of water one day. Water is about to get very, very expensive across the South West, and that's if it exists at all.

Even solar-powered desalination plants are extremely expensive to get off the ground. Although "clean" in their operation, solar panels are made with lead and other toxic heavy metals, and the electronics that drive these systems require rare earth metals mined in China. Even with renewable energy, it turns out, there is no "clean" way to get fresh water out of the ocean... not at any cost.

Millions of clueless residents have a rude surprise waiting for them in the years ahead

Ultimately, Mr. Mrowka is the one who is correct: Present-day human populations are not sustainable in the South West. This is a mathematical certainty, and it leaves just two options: 1) Mass migrations away from the cities, or 2) Mass death.

One way or another, the populations will have to come down or die of dehydration. In that sense, the problem is self-solving from a planetary perspective. Humans who are too stupid to live within the boundaries of geological resources will be evacuated or eliminated, one way or another.

But you can also expect violence to erupt in this process as states or regions go to war over water rights. Water, after all, equals economic productivity in the context of agriculture, and he who controls the water reaps the benefit of crop production. You can fully expect to see violent conflicts over these water rights in the decades ahead as the American South West collapses back into its more natural desert-like state.

Ultimately, Mother Earth wins all water wars. Humans who are too stupid to realize this will either be involuntarily relocated or removed from the gene pool.

Sources for this article include:
(1) http://www.telegraph.co.uk/news/worldnews/no...

Learn more: http://www.naturalnews.com/045790_Las_Vegas_water_supply_imminent_collapse.html#ixzz365ukmfaU

Get Your Basics

Get Your Basics

 
Don’t know what to get or where to start, well you aren’t the only one. I would recommend first starting with what you have the money, time and room for. So whether you start with 1 week for 1 person, or 1 year for 8 people, just get started!!! FEMA recommends that the average household obtain 2 weeks worth of food, but the average person only has 3 days. We can do better than that, just start doing a little each month!

“Church members can begin their home storage by storing the basic foods that would be required to keep them alive if they did not have anything else to eat. When members have stored enough of these essentials to meet the needs of their family, for one year, they may decide to add other items that they are accustomed to using day to day.” (The First Presidency letter, January 20, 2002)


Basic Recommendations for 1 Adult:

Grains 400 lbs (wheat, flour, rice, corn, oats, and pasta)
Legumes 60 lbs (dry beans,lima beans, soy beans, split peas)
Milk/Dairy 16 lbs (nonfat milk, evaporated milk, butter, eggs, cheese)
Fats & Oils 10 quarts (oil, shortening, mayonnaise, peanut butter)
Sugars 60 lbs (brown sugar, molasses, honey, corn syrup, jams)
Salt 8 lbs
Water (2 weeks) 14 gallons (2-week emergency reserve)


The cannery is a great place to purchase food for very cheap. It is run by the Church of Jesus Christ of Latter-Day Saints, but is open to the public and available for anyone to use.

BUCKETS

If you want to order bulk or don’t want your food tasting like metal, buckets are the way to go. You can order from a lot of places, but the cheapest and closest around that we’ve found is Baytec Containers. Make sure if you go the route of buckets you get:
  • Bucket (5 or 6 gallon) – I personally prefer a 5 gallon bucket over the 6 gallon ones, they store & stack better and fit under my pantry shelf. Also, buckets can get extrememly heavy so take that into consideration!
  • Lids (Regular or Gamma Lids) – I only use Gamma lids for food in the pantry that I need access too, the rest have a regular lid.
  • Mylar Bags  (Zipper or Regular) - These give the extra layer of protection for your food and helps keep oxygen and bugs out.
  • Oxygen Absorbers 2000 cc   - You will need 1 2000 cc oxygen absorber to put into each bucket or about 5-6 of the 300 cc ones.


How Much Can You Store In Buckets?

This is a good question, because having too few or too many buckets can be a problem. Here is an ESTIMATE of about how much you can put into buckets (don’t get mad if I’m off :). These 5 things are what I put into my buckets, the rest of the food I use #10 cans, except for Spaghetti, I put that in a pouch so I don’t have to break it into pieces. The cannery and other supply stores usually sell most of these items in 25 lb bags.
Food Item #10 Can 5 Gallon Bucket
  • Wheat 5 lbs 37 lbs
  • Oats 2.5 lbs 20lbs
  • Rice 5.3 lbs 36 lbs
  • Sugar 5.7 lbs 35 lbs
  • Flour 4.5lbs 33 lbs
These are some other options of what you can put into buckets:
  • Cornmeal 4.3 lbs 33 lbs
  • Popcorn 5 lbs 37 lbs
  • Spaghetti 4.3 lbs 30 lbs
  • Macaroni 3.1 lbs 21 lbs
  • Dried Beans 5.6 lbs 35 lbs
  • Lima Beans 5.4 lbs 35 lbs
  • Soy Beans 5 lbs 33 lbs
  • Split Peas 5 lbs 33 lbs
  • Lentils 5.5 lbs 35 lbs
  • Brown Sugar 4.42 lbs 33 lbs
  • Powdered Milk 3 lbs 29 lbs
  • Powdered Eggs 2.6 lbs 20 lbs
So figure out what you need and good luck with the math!

37 Creative Storage Solutions to Organize All Your Food & Supplies

37 Creative Storage Solutions to Organize All Your Food & Supplies


37 Creative Storage Solutions to Organize Your Food & Supplies! Prepared-Housewives.com #pantryorganization #foodstorage
One of the biggest concerns people have when beginning to prepare is…
Where the heck do I put everything?
With pantries shriveling away it makes it difficult to store hardly anything in them, and if you’re trying to store a year supply of food and supplies… you can just forget it!
But don’t worry, there is hope!
I searched high and low for ingenious ideas to help inspire you!

37 Creative Storage Solutions:

Take a look at these 37 Creative Storage Solutions - you’re likely to find at least a few that work for you!
  • USE WASTED SPACE…

Go on a tour of your home and find any wasted space! Look up high, down low, behind walls, in corners, and everywhere in between! You might be surprised how much you can actually store in these areas you originally over-looked!

Store Buckets Under The Bed

under the bed storage

Put Lazy Susans in the Corner Space of Pantries

make lazy susans for the corners of the pantry

Add Shelves Up High in Closets & Pantries

add shelves in wasted space in closets

Use Space Under Staircase

under the staircase

Add Strategic Shelving in Pantry

Organize the pantry add more shelves

Make Rolling Crates for Under the Bed

rolling crates for under bed

Use the Narrow Space Between Fridge & Counters

put food storage by fridge

Hang From the Ceiling

hang preps from ceiling

Use the Back of Doors

storing spices on cabinet door

  • MAKE DIY CAN ORGANIZERS…

For all the DIY people out there, these ideas are for you! If you can make your own organizers, then the storage possibilities are endless!!!

Roller Canned Food Cabinet

diy canned food cabinet tutorial

Wall-Hanging Can Storage

diy canned food storage rotation system

Built-in Food Dispenser

built in can dispenser

DIY FIFO Can Rack

fifo can rack for food storage

Food & Water Storage

diy food water storage

Use Soda Racks for Canned Goods

soda racks for canned goods

Organizer For Small Spaces

diy can organizer for small spaces

  • ORGANIZE YOUR SUPPLIES…

It’s not just food you need to store, but all your other day to day items. Here’s a few storage suggestions to find space for these too!

DIY Battery Storage Organizer

battery storage cabinet instructions

Make Furniture With Your Food & Supplies

make furniture with food storage and preps

Hide Items in a Bench Seat

store preps in bench

Roll-Out Storage

roll out pantry

Effectively Use Attic Storage

organize attic storage

  • SOLUTIONS FROM THE STORE…

If you don’t have the time or patience to make your own organizers (or worry about losing fingers), check-out these pre-made creative storage ideas that are ready to be shipped to your door!

Mom’s Mason Jar Hanger

Sew Your Own Poo Wipes ;)

Sew Your Own Poo Wipes ;)


Oh my, do we really have to talk about this? Can’t I just store a year’s supply of toilet paper and never think about such things?

Yes. But what happens when your one year supply only lasts six months because eating wheat and beans caused more intestinal problems than you anticipated? Every wise plan includes backups. Even if you never use them, you’ll still have the option to should the need arise and options are a very good thing. If you change your mind and decide during a disaster that flannel is better than tree leaves, you may no longer have electricity to run a sewing machine. So while we have the ability now, let’s get down to the nitty-gritty and sew some poo wipes!

IMG_4374
I began with 100% cotton flannel in a nice shade of brown (because let’s face it, that’s what color they will be in the end!) I cut mine into roughly 6×7 inch rectangles that were larger than my open hand. You’ll want to stitch your wipes two layers thick to protect your hands when wiping. If you’re in a situation where you’re having to use these, chances are water is pretty scarce and the last thing you need is to contaminate your hands with no way to thoroughly clean them.

IMG_2177
I’m using the same triple zigzag stitch and upholstery thread that I used in an earlier post to sew washable hankies. Believe me, you do NOT want these babies coming undone when you need them the most!

IMG_2179
Stitch the two pieces of fabric together, sewing off each edge to create nice, secure corners.

IMG_2184
Trim away hanging threads and cut the flannel close to the stitching to lessen fraying when these are washed later. Repeat, making enough wipes for your family. (Our best estimation is 6 wipes per person per day with a minimum 2 day supply on-hand.) These are large enough that you can wipe, fold in half to reveal the clean backside and wipe again but you’ll still need at least 6 per person per day. Children in diapers will need more. Leftover scraps can be stitched into smaller squares for them and they can be single ply instead of double ply if necessary.

IMG_2192
Now stack them up, tie a ribbon around them, print out the directions below, shove the wipes and the printout in a lidded plastic container and PRAY you never have to use them!

IMG_4372

How to Use Washable Flannel Bathroom Wipes

Needless to say these wipes will be contaminated and will need special handling. To use them, first find a large plastic container with a lid that closes. Some people online have suggested things like plastic cereal containers but anything that is large enough to hold ten wipes and doesn’t tip over easily will do. The closed lid prevents odors and poo water spills.
  1. Fill your plastic container 1/3 to 1/2 full of water and add a few drops of laundry detergent (or 2 drops dish soap if that happens to be all you have.)
  2. Use the wipe as needed. When it is dirty, place it in the plastic container to soak.
  3. At the end of EVERY DAY, collect the container from the bathroom. The water is dangerously contaminated and if you are in a situation where it has to be dumped outside, it MUST be kept from splashing on food-growing gardens and trees. Dump the liquid in a designated spot far away from the garden and places where children play. The wipes left inside the container have been pre-soaked and are no dirtier than a pair of lightly soiled children’s underwear. You can run them through your wash as usual or they can be washed on their own in a wash bucket.
  4. Rinse and refill the plastic container with soapy water and immediately return it to the bathroom. You should have a two day supply of wipes so that while the previous day’s wipes are drying, you have another set already waiting to be used in the bathroom.

Jun 27, 2014

25 Practical Survival Uses For Duct Tape

25 Practical Survival Uses For Duct Tape


If there ever was a miracle product better than spray-on-hair or the ShamWow, it is duct tape. Over the past 70 years of its existence, this staple product of fix-it-yourselfers has been used by virtually every walk of life, for jobs that I’m sure the duct tape developers never imagined. So how can we use it for survival?

Here are my top 25 survival uses for duct tape, in no order whatsoever.

1. Repairing a cracked water bottle or a pierced hydration bladder. A little strip of DT is the next best thing to a bandage for an ailing water vessel. Just dry the surface before you try to tape your patch in place, most forms of duct tape don’t stick to wet surfaces.
2. Survival arrow fletching.
Tear off a few 5-inch pieces, and a long edge of one piece to the arrow shaft, fold the tape lengthwise, and stick the other long edge of that piece to the arrow. Repeat this process one or two more times; trim the vanes to shape with your knife; and you will have a serviceable arrow fletching.
3. Butterfly bandage strips. Cut two small strips of DT, and add a smaller strip across their centers (sticky side to sticky side) to create a makeshift butterfly suture.
4. Make cordage. Twist one or several lengths of duct tape into a cord or rope.
5. Patch a hole in canoe. I wouldn’t trust my life to this one, but it’s been done more than once.
6. Fashion a belt. When you are starving in the wild, and your pants start falling down, run a piece of DT through your belt loops and stick it to itself in the front. Overlap it about 4 or 5 inches and you’ll still be able to peel the belt apart when nature calls.
7. First aid sling. Fold a length of DT down the middle, so that it is half the original width and no longer exposing a sticky side. Use the strap to make a sling for a busted arm.
8. Leave a note. Write on it with a Sharpie, or use strips to form letters.
9. Handcuff alternative. If someone is acting up during a survival emergency, you can duct tape their hands together around a tree to prevent them from becoming a danger to themselves or others.
10. Mend shoes and clothing. You can skip the sewing class, if you have enough duct tape.
11. Repair your glasses. The tape on your glasses may look a little nerdy, but at least you’ll still be able to see.
12. Attach shelter elements.
Just a few trash bags and some duct tape, and you have a survival shelter roof, or a sleeping bag cover, or a wind break, or…
13. Attach survival gear. Tape a spark rod to the side of your knife sheath, and you’ll always have a back-up fire source.
14. Make a hat. If you believe what you see on TV, the “Mythbusters” guys made a pretty nice looking hat out of duct tape on a recent episode.
15. Afix bandages. Place a sterile dressing over your wound, and strap it in place with DT. Hopefully you’re not too hairy where you got injured.
16. Fix your rain gear. Keep the dry stuff dry, and keep the water out, by mending your ripped rain gear with a few strips.
17. Make a drinking cup. Some creative folding and sticking can result in a cup you can drink from.
18. Make a spear. Strap your knife to a pole and you have a trusty spear to fend off beasts, or make one into your dinner.
19. Blister care. Cover the blistered area with a bit of cotton gauze, and tape over the cotton. Make sure that the duct tape fully covers the cotton and doesn’t touch the blister at all.
20. Mark a Trail. Use it to blaze a trail or signal for rescue, especially if your DT is brightly colored or reflective.
21. Make emergency repairs on your Bug Out Vehicle.
Leaking hoses and windows that won’t stay up don’t stand a chance against the mending powers of duct tape.
22. Keep the feathers in your sleeping bag. If you have a hole in your down sleeping bag, the feathers will pour out faster than excuses from a politician. Patch the hole with DT.
23. Keep your tent closed. A damaged zipper could leave your tent door flapping in the wind. Stick the door shut, and keep the bugs and critters out.
24. Splint a leg. A broken ankle or leg can be stabilized with ample splint material, padding and duct tape. Pad the crotch of a forked branch with some cloth and duct tape to fashion a quick crutch to go with your splint.
25. Splint a broken tent pole or fishing pole. By taping a stick to the broken area of your tent pole or fishing rod, you might just get one last adventure out of it.

Jun 26, 2014

15 Secrets to Dutch Oven Cooking

Living Well: 15 Secrets to Dutch Oven Cooking

 
15 Secrets to Dutch Oven Cooking  |  Design Mom

Images and text by Lindsey Johnson for Design Mom.
Are you ready for another installment of our Outdoor Cooking series (here’s part one)? I am too!
Cooking in a Dutch oven is one of life’s pleasures, I think. It’s hard to duplicate the feeling of cooking outdoors in a big, cast-iron pot over hot coals. It’s hard to duplicate that flavor too — a cross between cooking over a fire and using a slow cooker. I love it (if that wasn’t already obvious). :)
Dutch ovens have been around for years and years and years. Now that most of us do our daily cooking indoors on and in modern stoves and ovens, it seems like Dutch oven cooking is more for hobbyists and campers. If you haven’t enjoyed Dutch oven cooking as the cook or the eater, you’ve been missing out! It’s a lot of fun.

15 Secrets to Dutch Oven Cooking  |  Design Mom15 Secrets to Dutch Oven Cooking  |  Design Mom

Cooking with a Dutch oven might seem a little intimidating or complicated. I totally get that! But what you put into the Dutch oven is pretty simple and uncomplicated; the cooking part is where it can get a little tricky. There’s a bit of a learning curve to get the timing and temperature just right, but once those two things are covered, you’ll be set.

15 Secrets to Dutch Oven Cooking  |  Design Mom15 Secrets to Dutch Oven Cooking  |  Design Mom15 Secrets to Dutch Oven Cooking  |  Design Mom15 Secrets to Dutch Oven Cooking  |  Design Mom

You can cook or bake practically anything in a Dutch oven — they are incredibly versatile. Over the years we’ve modified old family favorites for use in a Dutch oven as well as finding new ones.
So, it’s time to pull out your favorite recipes and a pen and paper to take some notes!

15 Secrets to Dutch Oven Cooking  |  Design Mom

You will want to purchase or borrow a few things to get ready for your Dutch oven cooking adventures. You don’t need a ton of equipment, but there are a few essentials that you don’t want to be without. I’m listing them here and will cover each in a bit more detail as we go along.
-One or two Dutch ovens (or more if you’ve got a crowd!)
-Charcoal chimney starter
-Charcoal briquettes
-Something to put the lid on (a muffin tin works well)
-lid lifter
-high heat resistant gloves
-straw broom
-lighter fluid (optional, not pictured)

15 Secrets to Dutch Oven Cooking  |  Design Mom

DUTCH OVENS AND PREPARATION
As with anything, cooking with Dutch ovens does require a some planning and preparation.

Secret #1: You should buy a Dutch oven a little before you plan on using it to make sure you have time to properly season it. A well-seasoned Dutch oven makes for happier cooking and cleaning up. Seasoning means that it’s been rubbed with oil or vegetable shortening and baked in an oven for a few hours to develop a nice, black coating on the surface of the entire Dutch oven. It will become further seasoned as you use it, eventually becoming nonstick.

15 Secrets to Dutch Oven Cooking  |  Design Mom

Treat Dutch ovens as you do cast iron skillets and pans. If you’ve used those, it’s the same process for seasoning and care. There are aluminum Dutch ovens available, but the most common ones sold and used are cast iron. That’s what we’ll be talking about in this post.

Dutch ovens come with heavy lids that provide a good seal during cooking. Because the Dutch ovens are made of heavy cast iron, they retain heat very well. In fact, they can stay warm for hours and hours after cooking. Dutch ovens are best used for recipes requiring a long, slow cooking time, like stews, roasts, chili, etc. But they can also be used for things that cook in 30 minutes or less, like quick breads, rolls, cakes and cobblers. Dutch ovens lend great flavor to food from the oven itself and the charcoal briquettes. (You can’t get that from your indoor oven or a slow cooker!) Though I’m not covering the techniques in this post, dutch ovens are great for cooking bread and deep frying, as well.
Generally the cooking temperature will be about 350-400 degrees F. The cooking heat is generated from using coals placed underneath the pan and on top of the lid. You’ll see Dutch ovens with flat bottoms or with three little legs. The flat ones are better for indoor cooking. The ones with legs are the kind for outdoor use. I’m sure they were designed that way for other reasons too, but the little legs are nice because the Dutch oven keeps upright much better over the coals.

Let’s talk about the charcoal for a minute because it is such an important part of Dutch oven cooking!

15 Secrets to Dutch Oven Cooking  |  Design Mom

CHARCOAL
For getting the coals hot, we prefer using a charcoal chimney starter.
The advantage of a charcoal starter is that you can get the coals started quickly and (usually) evenly. The tall chimney shape keeps the coals protected from wind and keeps them together as they heat up. I honestly would recommend investing in one if you do a lot of cooking with charcoal.

 Secret #2: The charcoal needs to be started about 20-30 minutes before you plan on starting to cook. If you use a charcoal starter, it might only take 15 minutes. I use that time to mix my ingredients together. By the time I’ve put everything into the Dutch oven, the coals are hot and ready to be used.

15 Secrets to Dutch Oven Cooking  |  Design Mom15 Secrets to Dutch Oven Cooking  |  Design Mom

Directions for lighting charcoal:
Put charcoal in charcoal burner, drizzle with a little lighter fluid (optional, but helps to get it going quickly), the carefully add a lighted match.

15 Secrets to Dutch Oven Cooking  |  Design Mom

The general rule of thumb is two charcoal briquettes per inch in diameter, and typically more coals are placed on top than on bottom. For example, a 12-inch Dutch oven would have 14 coals on top and 8 underneath for a temperature of about 300 degrees F.

Secret #3: To raise the cooking temperature 25 degrees F, add an extra (preheated) briquette on both top and bottom.

Secret #4: The arrangement of the coals also matters. They need to be arranged evenly both top and bottom. Usually this is a circle around the perimeter with a few in the center. I’ve arranged them a little differently here because I was using the hard wood briquettes and they weren’t uniform in size.

15 Secrets to Dutch Oven Cooking  |  Design Mom15 Secrets to Dutch Oven Cooking  |  Design Mom

Ovens can go almost anywhere to cook just about anything you want. This could be your backyard, a park, campsite, etc. Just make sure the surface is heat proof. Concrete works great as does dirt. You can use Dutch ovens in a fire pit or on a grill like the one in the picture. I chose to do it this way for this post because I liked that it was high off the ground — while my kids were running around and playing. It also made it easier for me to check on it. But we also like placing it in on the ground in a fire pit because we can cook other things over the coals at the same time. Either way works great!
Dutch ovens come in various sizes. The most common sizes are 10″, 12″ and 14″. They also vary in depth. The bigger (and deeper) the Dutch oven, the more people you can feed, and the heavier they are. Keep that in mind too. We usually use 12″ ovens to cover our basic cooking needs.

15 Secrets to Dutch Oven Cooking  |  Design Mom

COOKING
Let’s talk a bit about the Do’s of Dutch oven cooking.

Secret #5: Do season it well and then rub the inside with a little oil every time you use it.

15 Secrets to Dutch Oven Cooking  |  Design Mom

Even though the Dutch oven has been seasoned, it’s a good idea to rub the inside with a little oil before using it. I just pour a little in the bottom and use a paper towel to wipe the entire inside. The outside doesn’t need to be rubbed with oil again before cooking. Also, Dutch ovens don’t require preheating, so unless a specific recipe lists preheating as part of the instructions, you won’t have to worry about doing that.

15 Secrets to Dutch Oven Cooking  |  Design Mom

Secret #6: Do line the inside with foil if you need to. Need to = if you’re cooking something especially sticky like fruit cobbler. Or, if you’re using acidic ingredients like tomatoes, lemon juice, wine, or vinegar, because they can remove some of the seasoned interior. To be honest, I usually don’t use foil with the acidic ingredients, but I am careful not to let the food sit in the dutch oven for too long after it’s done cooking. Note: It will take a little longer to cook if you line it with foil.

15 Secrets to Dutch Oven Cooking  |  Design Mom

Some other quick Do not’s for Dutch oven cooking include

Secret #7: Don’t ever pour cold water into a hot oven to cool it off, it will ruin it.

Secret #8: Don’t drop it! They look indestructible, but they can break, or break your toe. : )

 Secret #9: Make sure the lid is on properly and fits tightly so heat doesn’t escape. And don’t set the lid directly on the ground — use a pan, brick, or rock (I like using an upside down muffin tin) — it keeps dirt or other things from being transferred from the ground to your food.

Secret #10: Don’t use plastic or silicone cooking utensils. Wood or metal only.

Secret #11: When you’re finished cooking, do use the broom to clear the lids of ash so that it doesn’t get into the food.

15 Secrets to Dutch Oven Cooking  |  Design Mom

Secret #12: If you have more than one Dutch oven, you can stack them. The coals on top of the bottom oven become the bottom coals for the top oven. Know that this will require more time and you might have to add fresh coals to keep it cooking hot enough for both ovens.

Secret #13: Timing depends on recipes, ingredients, and the size of the dutch oven. For example, with my Chicken Provencal stew (pictured in this post), I wanted to add some zucchini. Like with slow cookers, zucchini would disintegrate during a long cooking period. Add things that cook quickly near the end of cooking time. I added the zucchini about 30 minutes before the stew was ready. Start the ovens that takes the longest to cook first — desserts and ovens with just vegetables don’t take as long to cook. Also, you’ll need to add more time for deeper ovens.

Secret #14: As far as clean up goes, if the Dutch oven is well-seasoned, it will be a snap! It should just wipe out. (Toss any aluminum foil you might have used.) If the food was too messy to simply wipe out with a paper towel, use a little water or oil mixed with some salt. It will help scour the inside without damaging the seasoning. Let it dry thoroughly, then rub inside and out with oil.
Before we get to recipes, here’s one last rule of thumb I’ve found helpful,

Secret #15:
If you can hear it, it’s hot enough.
If you can smell it, it’s probably getting close to being done.

15 Secrets to Dutch Oven Cooking  |  Design Mom15 Secrets to Dutch Oven Cooking  |  Design Mom

RECIPES
I chose one of my favorite recipes to turn into a Dutch oven recipe — this Chicken Provencal is amazing! We usually do it in the oven or slow cooker. Happily it’s even more delicious in the Dutch oven! Stews do really well in Dutch ovens. We also made a Summer Fruit Cobbler.

Dutch Oven Chicken Provencal Stew
adapted from Big Girls, Small Kitchen
For one 12-inch Dutch oven, to feed 6-8

Ingredients:
3 lbs. bone-in chicken thighs, skin removed (can use boneless)
1 large onion, thinly sliced
1/4 cup red or white wine vinegar
1/4 cup chicken stock or white wine
1 small can tomato paste
3 Tablespoons brown sugar
3 Tablespoons olive oil
3 Tablespoons minced fresh garlic
1/4-1/2 cup chopped, pitted kalamata olives
5 large pitted dates, chopped
2 Tablespoons fresh oregano (or 1-2 teaspoons dried)
Salt and pepper, to taste
2 zucchini cut into 1/2″ rounds
6 whole roma tomatoes
Fresh parsley, for garnish

Instructions:
Combine all ingredients except zucchini and roma tomatoes in a gallon sized resealable plastic bag or large bowl covered with plastic wrap. Chill until ready to cook. (Can be done one day in advance.)
Rub the inside of the Dutch oven with oil. Place the entire contents of the bag or bowl into the oven. Arrange the chicken with a spoon or spatula so it is in an even layer. Place the Roma tomatoes evenly around. Place the lid on top.

15 Secrets to Dutch Oven Cooking  |  Design Mom

Place 8 coals under the oven and 14 coals on top. Cook for about two hours or until the sauce has thickened quite a bit and the chicken is falling away from the bone. Add the zucchini during the last 30 minutes of cooking time. Garnish with fresh parsley and serve with crusty bread, potatoes, rice or couscous.

15 Secrets to Dutch Oven Cooking  |  Design Mom15 Secrets to Dutch Oven Cooking  |  Design Mom15 Secrets to Dutch Oven Cooking  |  Design Mom

Dutch Oven Summer Fruit Cobbler
For shallow 12-inch Dutch oven, if using a deeper one, double the fruit and filling ingredients but keep the topping the same

Ingredients:
2-2 1/2 lbs. fresh or frozen peaches
4 cups fresh or frozen berries (I used strawberries and blueberries)
1 cup sugar (use a little less if your fruit is really sweet)
1/4 cup cornstarch
pinch salt

Topping:
1 1/2 cups all-purpose flour
1/2 cup stone ground corn meal (coarse or fine)
1/4 cup dry milk powder (omit if you use fresh milk instead of water)
2-4 Tablespoons sugar
1 Tablespoon baking powder
1/2 teaspoon salt
1 stick (8 Tablespoons) cold butter, cut into 8 pieces
1 1/2 cups cold water or milk (omit dry milk powder if using fresh milk)

Instructions:
For filling-
Mix cornstarch, sugar and salt together. Set aside until ready to assemble cobbler.

For topping-
Whisk all of the dry ingredients together. Add the cold butter and cut into the dry ingredients using a pastry cutter or your hands. The mixture will look like cornmeal with larger, pea-sized pieces of butter remaining. If making in advance, transfer to a large resealable plastic bag or cover bowl with plastic wrap. Chill until ready to make the batter.

To assemble:
For filling-
In a large bowl mix all of the fruit with the cornstarch and sugar. Let stand for a few minutes to allow sugar to dissolve. Transfer to the Dutch oven. (Can line with foil because it will be sticky!)

For topping-
Add the cold water or milk to the bag or bowl and mix just until combined. Pour over the fruit. Put lid on top and use 8 coals on bottom and 14 coals on top. Cook for about 30 minutes or until the juices are bubbling and the top is golden brown.

Serve warm with whipped cream or ice cream. Makes about 8-10 servings.

15 Secrets to Dutch Oven Cooking  |  Design Mom