The best apple cider vinegars are organic, unfiltered and raw (unpasteurized).
I personally use scraps (peels and cores). This way I get to eat my apples and make vinegar too. Or if you are making a pie or apple sauce… instead of throwing away the scraps, you can start making your first vinegar.
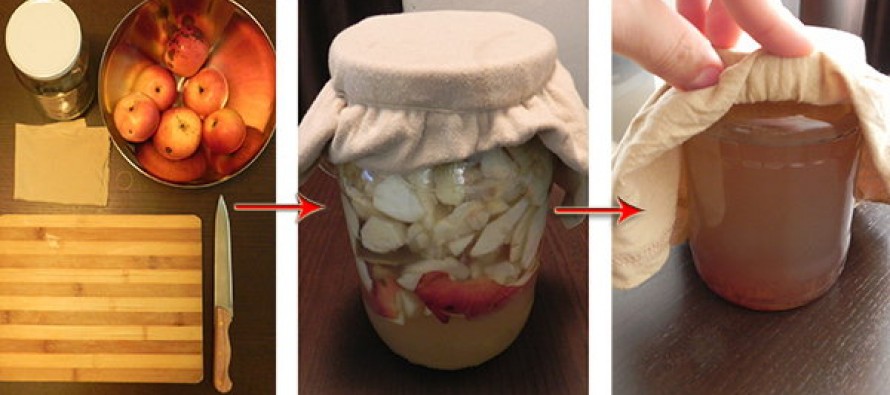
 You’ll need:
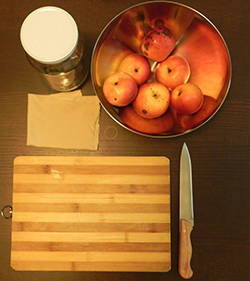
 Peel the apples and fill you container by at least half way with your apple scraps (peels & cores), seed, stems and all. If at least half the container is not filled, add additional apple scraps until you achieve this level as a minimum.
Make sure the pieces are big enough to strain out easily later (no puree).
Pour in room temperature (filtered) water until the chopped apples are completely covered and the container is just about full leaving 1-2 inches at the top.
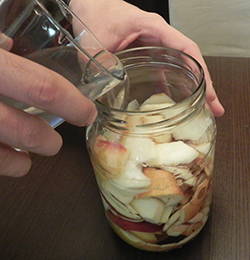
 Stir in the raw honey or cane sugar until fully dissolved.
Optional: you may add yeast to speed up the process of fermentation (Special cultivated yeasts are available for this purpose at wine-making shops).
Tip: You could use raw apple cider vinegar to jump start this fermentation, use 2 Tablespoons per quart.
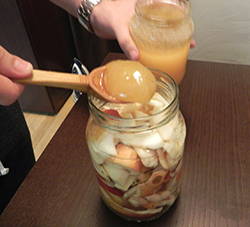
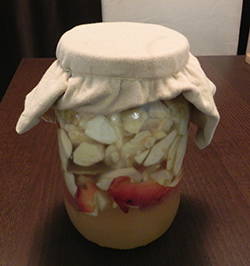 Cover the top of the glass jar with cheesecloth, a thin white dishtowel or floursack cloth and secure with a large rubber band.
Stir the mixtures daily. Keep the containers away from direct sunlight and maintain the temperature at 60 to 80 degrees F.
The healthy bacteria that create vinegar require oxygen for the process, so it is important not to seal the container with a lid until the vinegar is as strong as you want it to be.
 Leave on the counter for about 1 week.
Bubbles will begin to form as the sugar ferments into alcohol.
As you can see it did some bubbles – a good sign that bacteria had eaten the sugars and had produced carbon dioxide in this process (aka fermentation)
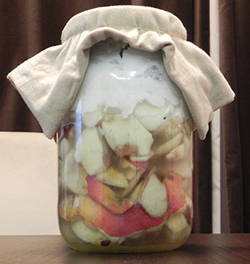
When the apple scraps no longer float and sink to the bottom of the jar (see picture) after approximately one week (but it can take 2), the hard apple cider is ready.
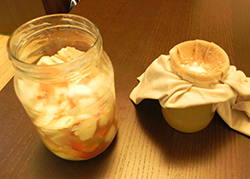 Strain out the apple scraps and pour the hard apple cider into another glass jar.
Cover with a fresh piece of cheesecloth and secure with a rubberband. Leave on the counter in an out of the way spot for an additional 3-4 weeks to allow the alcohol to transform into acetic acid by the action of acetic acid bacteria.
Flouting in your vinegar you’ll find “Mother of vinegar” – a substance composed of a form of cellulose and acetic acid bacteria that develops on fermenting alcoholic liquids, which turns alcohol into acetic acid. This is normal!

Gently dipping a spoon somewhere around the edge of the “mother” where it touches the container, gather just enough of the vinegar for a taste. If your ferment tastes quite acidic or pleasant to you and you are ready to bottle your vinegar
Filter the liquid through several layers of fine cheesecloth or filter paper—a coffee filter works well for this. This removes the mother of vinegar, preventing further fermentation or spoilage of the product.
If the vinegar highly acidic and you find it almost too potent you can simply add some spring or filtered water to mellow the acidity.
Raw apple cider vinegar doesn’t go bad, but if you leave it for a long time, another mother culture will likely form on top. This is fine, just strain it again and dilute with a bit of water if the taste has become too strong. If you want to prevent this from happening you have to pasteurize the raw vinegar.
Learning how to do stuff on your own its an important skill (and could be a way of life), not only to save money or to stay away from GMO’s, but to better yourself. And in darker times or in time of crisis to be able to support and sustain your family without much outside aid. This is one of the things that I’ve learned from a well-known army officer vet Steve Walker, for whom I have all the respect in the world. Watch his video and learn quite a few efficient and unconventional fast-tips about protecting your family in time of war or social chaos.
To pasteurize you vinegar, pour the vinegar into a large stainless steel or enamel coated pot.
Over medium heat bring the vinegar up to 140 degrees and hold it at this temperature for 10 minutes. Be careful not to boil your vinegar. Turn off the heat and allow the vinegar to cool, uncovered. Once it’s cooled, pour the vinegar into your storage container and seal until ready to use.
Do not use a metal container when making vinegar; acid in the mixture will corrode metal or aluminum objects. Glass, plastic, wood, enamel, or stainless steel containers should be used for making or storing vinegar.
http://www.askaprepper.com/making-apple-cider-vinegar-home/
I personally use scraps (peels and cores). This way I get to eat my apples and make vinegar too. Or if you are making a pie or apple sauce… instead of throwing away the scraps, you can start making your first vinegar.
You’ll need:- apple peels, cores and any browning/discolored flesh from pesticide-free apples (I used only 3 of them)
- one large jar (for fermentation) and another one to let the vinegar rest
- a rubber band
- Cheesecloth or floursack cloth
- Honey or granulated sugar
- Water
Peel the apples and fill you container by at least half way with your apple scraps (peels & cores), seed, stems and all. If at least half the container is not filled, add additional apple scraps until you achieve this level as a minimum.Make sure the pieces are big enough to strain out easily later (no puree).
Pour in room temperature (filtered) water until the chopped apples are completely covered and the container is just about full leaving 1-2 inches at the top.
Stir in the raw honey or cane sugar until fully dissolved.Optional: you may add yeast to speed up the process of fermentation (Special cultivated yeasts are available for this purpose at wine-making shops).
Tip: You could use raw apple cider vinegar to jump start this fermentation, use 2 Tablespoons per quart.
Cover the top of the glass jar with cheesecloth, a thin white dishtowel or floursack cloth and secure with a large rubber band.Stir the mixtures daily. Keep the containers away from direct sunlight and maintain the temperature at 60 to 80 degrees F.
The healthy bacteria that create vinegar require oxygen for the process, so it is important not to seal the container with a lid until the vinegar is as strong as you want it to be.
Leave on the counter for about 1 week.Bubbles will begin to form as the sugar ferments into alcohol.
As you can see it did some bubbles – a good sign that bacteria had eaten the sugars and had produced carbon dioxide in this process (aka fermentation)
When the apple scraps no longer float and sink to the bottom of the jar (see picture) after approximately one week (but it can take 2), the hard apple cider is ready.
Strain out the apple scraps and pour the hard apple cider into another glass jar.Cover with a fresh piece of cheesecloth and secure with a rubberband. Leave on the counter in an out of the way spot for an additional 3-4 weeks to allow the alcohol to transform into acetic acid by the action of acetic acid bacteria.
Flouting in your vinegar you’ll find “Mother of vinegar” – a substance composed of a form of cellulose and acetic acid bacteria that develops on fermenting alcoholic liquids, which turns alcohol into acetic acid. This is normal!
after 4 weeks
Filter the liquid through several layers of fine cheesecloth or filter paper—a coffee filter works well for this. This removes the mother of vinegar, preventing further fermentation or spoilage of the product.
If the vinegar highly acidic and you find it almost too potent you can simply add some spring or filtered water to mellow the acidity.
Raw apple cider vinegar doesn’t go bad, but if you leave it for a long time, another mother culture will likely form on top. This is fine, just strain it again and dilute with a bit of water if the taste has become too strong. If you want to prevent this from happening you have to pasteurize the raw vinegar.
Learning how to do stuff on your own its an important skill (and could be a way of life), not only to save money or to stay away from GMO’s, but to better yourself. And in darker times or in time of crisis to be able to support and sustain your family without much outside aid. This is one of the things that I’ve learned from a well-known army officer vet Steve Walker, for whom I have all the respect in the world. Watch his video and learn quite a few efficient and unconventional fast-tips about protecting your family in time of war or social chaos.
Pasteurizing the Vinegar (optional)
Pasteurizing destroys the living bacteria in the vinegar stopping any more growth, stabilizing the flavor and lengthening shelf lifeTo pasteurize you vinegar, pour the vinegar into a large stainless steel or enamel coated pot.
Over medium heat bring the vinegar up to 140 degrees and hold it at this temperature for 10 minutes. Be careful not to boil your vinegar. Turn off the heat and allow the vinegar to cool, uncovered. Once it’s cooled, pour the vinegar into your storage container and seal until ready to use.
Caution
Two factors require special attention when making vinegar at home: oxygen supply and temperature. Oxygen is spread throughout the mixture by stirring it daily and by letting air reach the fluid through a cheesecloth filter, which is used in place of a regular lid. The temperature of fermenting cider should be kept between 60 and 80 degrees Fahrenheit (F). Lower temperatures do not always produce a usable vinegar, and higher ones interfere with the formation of the “mother of vinegar”.Do not use a metal container when making vinegar; acid in the mixture will corrode metal or aluminum objects. Glass, plastic, wood, enamel, or stainless steel containers should be used for making or storing vinegar.
http://www.askaprepper.com/making-apple-cider-vinegar-home/
No comments:
Post a Comment
Note: Only a member of this blog may post a comment.